
How to Identify Mud Cracks in the Field
Ever walked across a dry lake bed and thought you were looking at ancient pavement, only to realize the ground was splitting right under your boots? I’ve been there. My first field season, I mistook a set of desiccation cracks for a fault line and spent an hour mapping nothing. Embarrassing? Absolutely. But it taught me a critical lesson: how to identify mud cracks in the field isn’t just about seeing cracks—it’s about reading the whole story of the sediment. Let me save you that same heartache.
Look—mud cracks are more than fractured dirt. They’re a snapshot of a paleoenvironment. They tell you about drying rates, water chemistry, and even ancient climate cycles. But you can’t just glance at a cracked surface and call it a day. You need to know what you’re actually looking at. So pull out your hand lens and let’s get into the nitty-gritty.
The Telltale Signs: Geometry, Color, and Scale
When you’re staring at a cracked surface, your brain wants to see a pattern. And that’s good—because mud cracks in the field almost always form polygonal shapes. But not all polygons are created equal. The real trick is in the details.
Polygonal Patterns and What They Mean
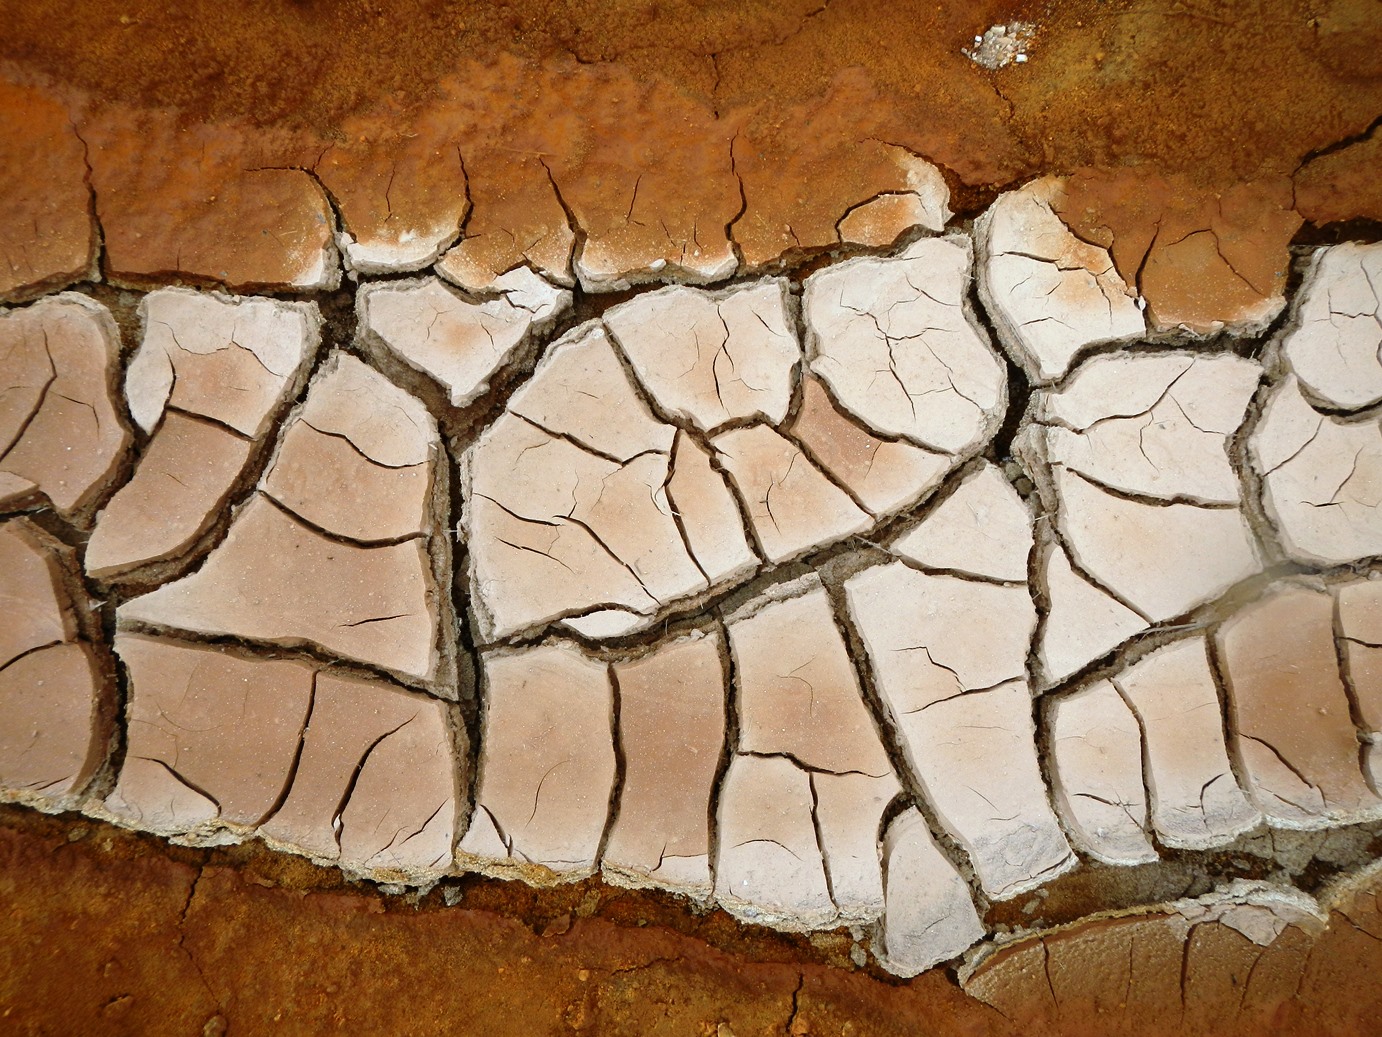
Fresh desiccation cracks typically form interlocking polygons with 4 to 6 sides. Seriously, go out and count them. If you see mostly 5-sided shapes, you’re likely looking at classic mud cracks formed by slow, even drying. But here’s the kicker: the size of those polygons tells you about the sediment. Fine-grained clays shrink more and form smaller, tighter polygons; silty or sandy muds produce larger, more irregular shapes. I can’t tell you how many times I’ve seen students confuse this with frost wedging. Frost wedging gives you angular, broken chunks. Mud cracks? They taper downward into a V-shape profile. That’s a dead giveaway.
Color also matters. Identifying mud cracks in the field often hinges on subtle color changes. Fresh cracks expose slightly darker, wetter sediment underneath. Ancient cracks—the ones preserved in rock—may be filled with lighter-colored sand or calcite. If you see a red-brown mudstone with white, jagged lines running through it, congratulations: you’re likely looking at a filled mud crack. Think of it as a fossilized wrinkle in time.
One more thing: scale. A single mud crack can be a few millimeters or over a meter across. I’ve stood on cracks in the Namib Desert that were big enough to swallow my boot. Don’t assume small cracks are young or large cracks are old—that’s not how it works. The scale depends on sediment thickness and drying intensity. Thicker mud layers crack wider. Period.
Vertical Profile: The V-Shape Rule
Here’s a field technique that will save you from looking like a rookie. Dig a small trench across a suspected mud crack. Seriously, just scrape a few inches down. If the crack widens at the top and narrows to a point at the bottom, you’ve got classic desiccation. That V-shape is the hallmark of mud cracks in the field. Syneresis cracks—which also form in mud—are different: they’re often wavy, discontinuous, and don’t taper. I’ve had colleagues argue with me about this until I pulled out a knife and showed them. Trust the V.
Also look for curled edges. When mud dries, the edges of the polygons often curl upward. That’s because the top surface shrinks faster than the bottom. It’s like a pie crust pulling away from the pan. If you see that curl, you’re almost certainly dealing with subaerial exposure—the mud dried out in the open air, not underwater. That’s a huge clue for paleoenvironmental reconstruction.
Finally, check the base of the crack. If it’s clean and sharp, the sediment was firm when it cracked. If it’s fuzzy or gradational, the mud was soft and the crack may have been deformed later. You’d be surprised what tiny details can tell you.
The Context Matters: Matrix, Climate, and Bedding Planes
You don’t identify mud cracks in isolation. You read them within the rock or sediment package around them. This is where field geology becomes detective work. And honestly? It’s the most fun part.
Reading the Matrix: Grain Size and Cementation
If you’re working in a lithified rock unit—say a shale or mudstone—pay attention to mud cracks in the field preserved as casts or molds. The matrix tells the story. Very fine-grained mudstone with abundant mica flakes suggests slow deposition in still water. That sets the stage for later cracking during drought periods. But here’s a trap: if the rock is heavily cemented with calcite or silica, the cracks might be filled with the same cement, obscuring the original shape. In that case, you need to look for subtle color banding or trace fossils that might hint at desiccation. I always carry a bottle of dilute HCl for that—fizzes on calcite fill? That’s a crack.
Also, consider the bedding planes. Identifying mud cracks in the field on a fresh surface is easy. But on weathered outcrops, wind and rain can create pseudo-cracks that look real. I’ve lost count of how many times I’ve seen a joint or a fracture mistaken for a mud crack. The trick is to examine the crack’s relationship to bedding. Real mud cracks are confined to a single bedding plane—they don’t cut across layers. Joints do. Use your hammer to split the rock along the bed. If the cracks disappear, you’ve got it right.
Another contextual clue: ripple marks often co-occur with mud cracks in tidal or lacustrine settings. If you see ripple marks on the same surface with cracks, you’re looking at an environment that alternated between wet and dry. That’s gold for your field notes.
Climate Clues and Preservation Bias
Did you know that how to identify mud cracks in the field can actually tell you about ancient rainfall patterns? It’s true. Very narrow, deep cracks suggest rapid drying—like a flash drought. Wide, shallow cracks indicate slow, prolonged drying with intermittent moisture. If you see multiple generations of cracks (some filled, some open), that’s a record of repeated drying and wetting cycles. I once spent a whole day measuring crack widths on a single outcrop in Montana and came away with a seasonal precipitation curve. My colleagues thought I was insane. It worked.
But here’s the harsh reality of field work: preservation bias is real. Mud cracks are fragile. They only survive if they’re quickly buried by another sediment layer—sand, ash, or another mud layer. If you find perfectly preserved cracks without any overlying sediment, they’re probably modern. Ancient ones are almost always filled or covered. So don’t assume every cracked surface you see is a fossil. Check for a cap rock.
Use bullet points to keep this straight in your field journal:
- Narrow, deep cracks = rapid evaporation, arid pulses.
- Wide, shallow cracks = slow drying, humid intervals.
- Multiple crack generations = fluctuating water levels.
- Curled edges = subaerial exposure, no water cover.
- Filled cracks = burial by sediment or cement.
Common Pitfalls and Pro Tips for Identification
Alright, let’s get real. I’ve made every mistake in the book, and I’ve seen students and even seasoned geologists get tripped up. So consider this your cheat sheet to avoid looking foolish.
Mud Cracks vs. Other Features
First up: mud cracks in the field can be confused with ice crystal impressions, root casts, or even animal burrows. Ice crystals form star-shaped or dendritic patterns—not polygons. Root casts are cylindrical and often branch. Burrows generally don’t form connected networks on bedding planes. If you see a polygonal network, you’re likely on the right track. But still, check the cross-section. Always. A root cast will be a tube; a mud crack will be a V.
Another common impostor is the desiccation crack that’s been tectonically deformed. If the rock has been folded or faulted, those original V-shapes can get squished into weird geometries. In that case, look for filled cracks that are now contorted. That’s still a mud crack—just one that took a geological beating.
Pro tip: use a permanent marker to outline the polygons on the outcrop before you photograph them. It helps you see the pattern when the light is harsh. Photography in the field is tricky, and shadows can play tricks. Outline first, shoot later.
Field Tools and Tricks of the Trade
You don’t need a lab to identify mud cracks in the field. A hand lens, a rock hammer, and a bottle of water are your best friends. Spray a little water on the surface—the cracks will absorb it and darken, while the surrounding matrix stays lighter. Instant contrast. I’ve used this trick in the high Andes and the Sahara. Works every time.
Also, learn to trust your fingertips. Run your finger across the surface. Mud cracks feel slightly rough or gritty because the edges are exposed. Joints feel glassy or smooth. It’s a tactile skill that takes practice, but it’s worth developing.
Here’s a numbered list I give to every student before their first field mapping project:
- Look for polygons on a bedding plane.
- Check the cross-section for V-shaped tapering.
- Spray water to highlight cracks.
- Verify the cracks don’t cross bedding (if lithified).
- Note any fill material (sand, calcite, iron oxide).
- Record polygon size and shape in your field book.
- Photograph with scale (put a coin or lens cap in the frame).
Common Questions About Identifying Mud Cracks in the Field
What’s the difference between mud cracks and syneresis cracks?
Syneresis cracks form underwater when clay shrinks due to chemical changes, not exposure. They’re usually wavy, discontinuous, and lack the classic V-shape profile. Mud cracks in the field are polygonal, taper downward, and indicate drying. If you’re unsure, check for curled edges—mud cracks have them; syneresis cracks don’t.
Can mud cracks tell me the ancient climate?
Absolutely. Crack width and depth correlate with drying rates and humidity. Multiple stacked crack layers suggest seasonal or event-driven wet-dry cycles. I’ve used crack morphology in Permian red beds to argue for monsoon-like conditions. It’s a powerful tool if you measure systematically.
How do I preserve a mud crack sample for lab analysis?
Epoxy peeling is the go-to method. Clean the surface, apply a low-viscosity epoxy, let it cure, and peel it off. You’ll get a perfect replica of the crack network. For lithified samples, cut a slab perpendicular to the bedding to see the V-shape in cross-section. Label everything—I’ve lost too many samples to sloppy labeling.
Are mud cracks always sedimentary structures?
Almost always. But you can occasionally see desiccation in volcanic ash or even some carbonate muds. The process is the same: shrinkage upon drying. Still, the classic context is fine-grained siliciclastic sediment like clay or silt. If you’re in a sandstone, those aren’t mud cracks.
What if I find mud cracks in a metamorphic rock?
Good eye. If the rock has been metamorphosed, the cracks may be stretched or folded but the original polygonal pattern can survive low-grade metamorphism. Look for aligned micas filling the cracks or a darker color along the former crack plane. It’s rare, but it happens—and it’s a fantastic find for your field report.