
So, you've done it. You, or someone you know, pointed a laser at a camera lens. Maybe it was a stupid party trick, maybe a rogue beam from a laser show, or maybe (and this happens more than you'd think) you accidentally let sunlight concentrate through a magnifying glass onto a glass element. The result is the same: a little black or red dot burned right into the glass.
I've been in the optics repair game for over a decade. I've seen this hundreds of times. And I'm going to give you the honest, no-BS truth. You are not going to fix this with a magic eraser, a polishing cloth, or a YouTube hack involving toothpaste. Seriously. Don't even try that. You will make it worse.
Most articles online will tell you to send it to a professional. That's great advice, but it's also vague. What does that repair actually look like? What are the risks? Can it be done? This is the deep dive. Let's talk about how to repair a laser damaged camera lens professionally, from the perspective of someone who actually has the spanner wrenches and the ultrasonic cleaners.
The Brutal Reality Check of Laser Damage
Let's get this out of the way immediately: laser damaged camera lens repair is not a DIY project for 99% of cases. The laser doesn't just put a stain on the glass. It physically alters the structure of the glass or, more commonly, the delicate anti-reflective (AR) coatings. A high-power laser (or even a cheap green pointer focused tightly) essentially vaporizes a tiny spot of the coating. It's a microscopic crater.
You cannot buff that out. The coating is a thin-film interference stack, measured in nanometers. Polishing it would remove the entire coating layer, leaving a ghostly, hazy spot that scatters light even worse than the burn. Professional camera lens repair in this context is almost always a surgical strike: replacement of the individual glass element.
#### Why Lasers Are Different Than Scratches
I cannot stress this enough. A scratch is a mechanical gouge. A laser burn is a thermal event. When a collimated beam hits the glass, it generates intense heat. That heat can:
- Burn the AR coating (90% of cases). - Create a micro-fracture in the glass itself (rare, but possible with pulsed lasers). - Melt the optical cement (balsam) holding two elements together in a cemented group (common in zoom lenses).
If the damage is on the outermost element, you might have a fighting chance. If it's deep inside the lens, or on a cemented group, the repair is a full-blown optical surgery. This isn't about wiping a smudge. This is about optical alignment, centration error, and maintaining the lens's original resolving power.
#### The Sensor vs. The Lens
Stop. Before you do anything, check your camera's sensor. Seriously. If the laser was powerful enough to burn a lens, it likely passed through the lens and hit the sensor. A burned sensor is a much, much bigger problem (often a total camera write-off). If your sensor is fine, you got lucky. Laser-damaged lens repair is pointless if you're just putting a damaged lens on a dead camera. Always assess the entire optical chain first.
Assessing the Damage: Can It Be Saved?
Before you even think about picking up a tool, you need a proper diagnosis. Look at the damage under a bright light, ideally with a loupe. The nature of the burn dictates the path forward.
#### Visual Identification and Light Scatter
Take the lens outside in the sun. Point the lens at the sky and look through it from the rear. See that tiny pinprick of light? That's the scatter. The burned area is now a light-diffusing element. It reduces contrast and introduces flare in backlit situations. If the burn looks like a black dot, it's a coating burn. If it looks like a cloudy, cracked dot, it might be glass damage or cement separation.
Here is the simple assessment checklist:
- Burn on the front element, small, localized: Best-case scenario. The front element is usually the cheapest and easiest to source or replace. - Burn on the rear element: Worse. The rear element is critical for image formation. Even a tiny defect here creates a noticeable soft spot in the image. - Burn on an internal cemented group: This is the nightmare. The element is buried. You have to disassemble the entire optical block, separate the cemented glass, re-cement a new element, and re-collimate the lens. - Burn on a moving element (zoom lens): Adds complexity. The internal mechanics must be perfectly preserved during teardown.
#### The Laser Damage Meter
I categorize damage into three tiers. Be honest with yourself here.
1. Tier 1 (Cosmetic): A tiny dot on the front coating. It doesn't show in photos unless you shoot into the sun at f/16. If you can live with a slight contrast drop in harsh light, honestly? Just leave it. The cost of professional laser damaged camera lens repair might exceed the value of the lens. 2. Tier 2 (Functional): The burn is medium-sized, in the middle of the glass, or on an internal element. It visibly degrades image quality. You need a repair. This is where we get into the actual work. 3. Tier 3 (Structural): The glass is cracked, the cement is bubbling, or the burn is a large, opaque mess. The lens element is destroyed. You cannot repair the element itself. You can only replace it.
The Professional Repair Process (Step-by-Step)
Alright. You have a Tier 2 or Tier 3 lens. You've decided to go for it. You're either doing this yourself (with extreme caution) or you want to know what the shop is actually going to do. Here is the real workflow for how to repair a laser damaged camera lens professionally.
#### Step 1: Micro-Lapping (The Almost-Useless Myth)
Some old-school technicians will try micro-lapping a coating burn. This involves using a very fine diamond slurry to physically grind down the surface of the glass until the burn is gone and then re-polishing it. I have done this. It works on thick, flat glass, like a filter. It almost never works on a curved, multi-coated camera lens element. The polishing process changes the radius of curvature, introducing spherical aberration. The lens will be softer. Don't expect a micro-lapped lens to perform like new. It's a hack, not a repair.
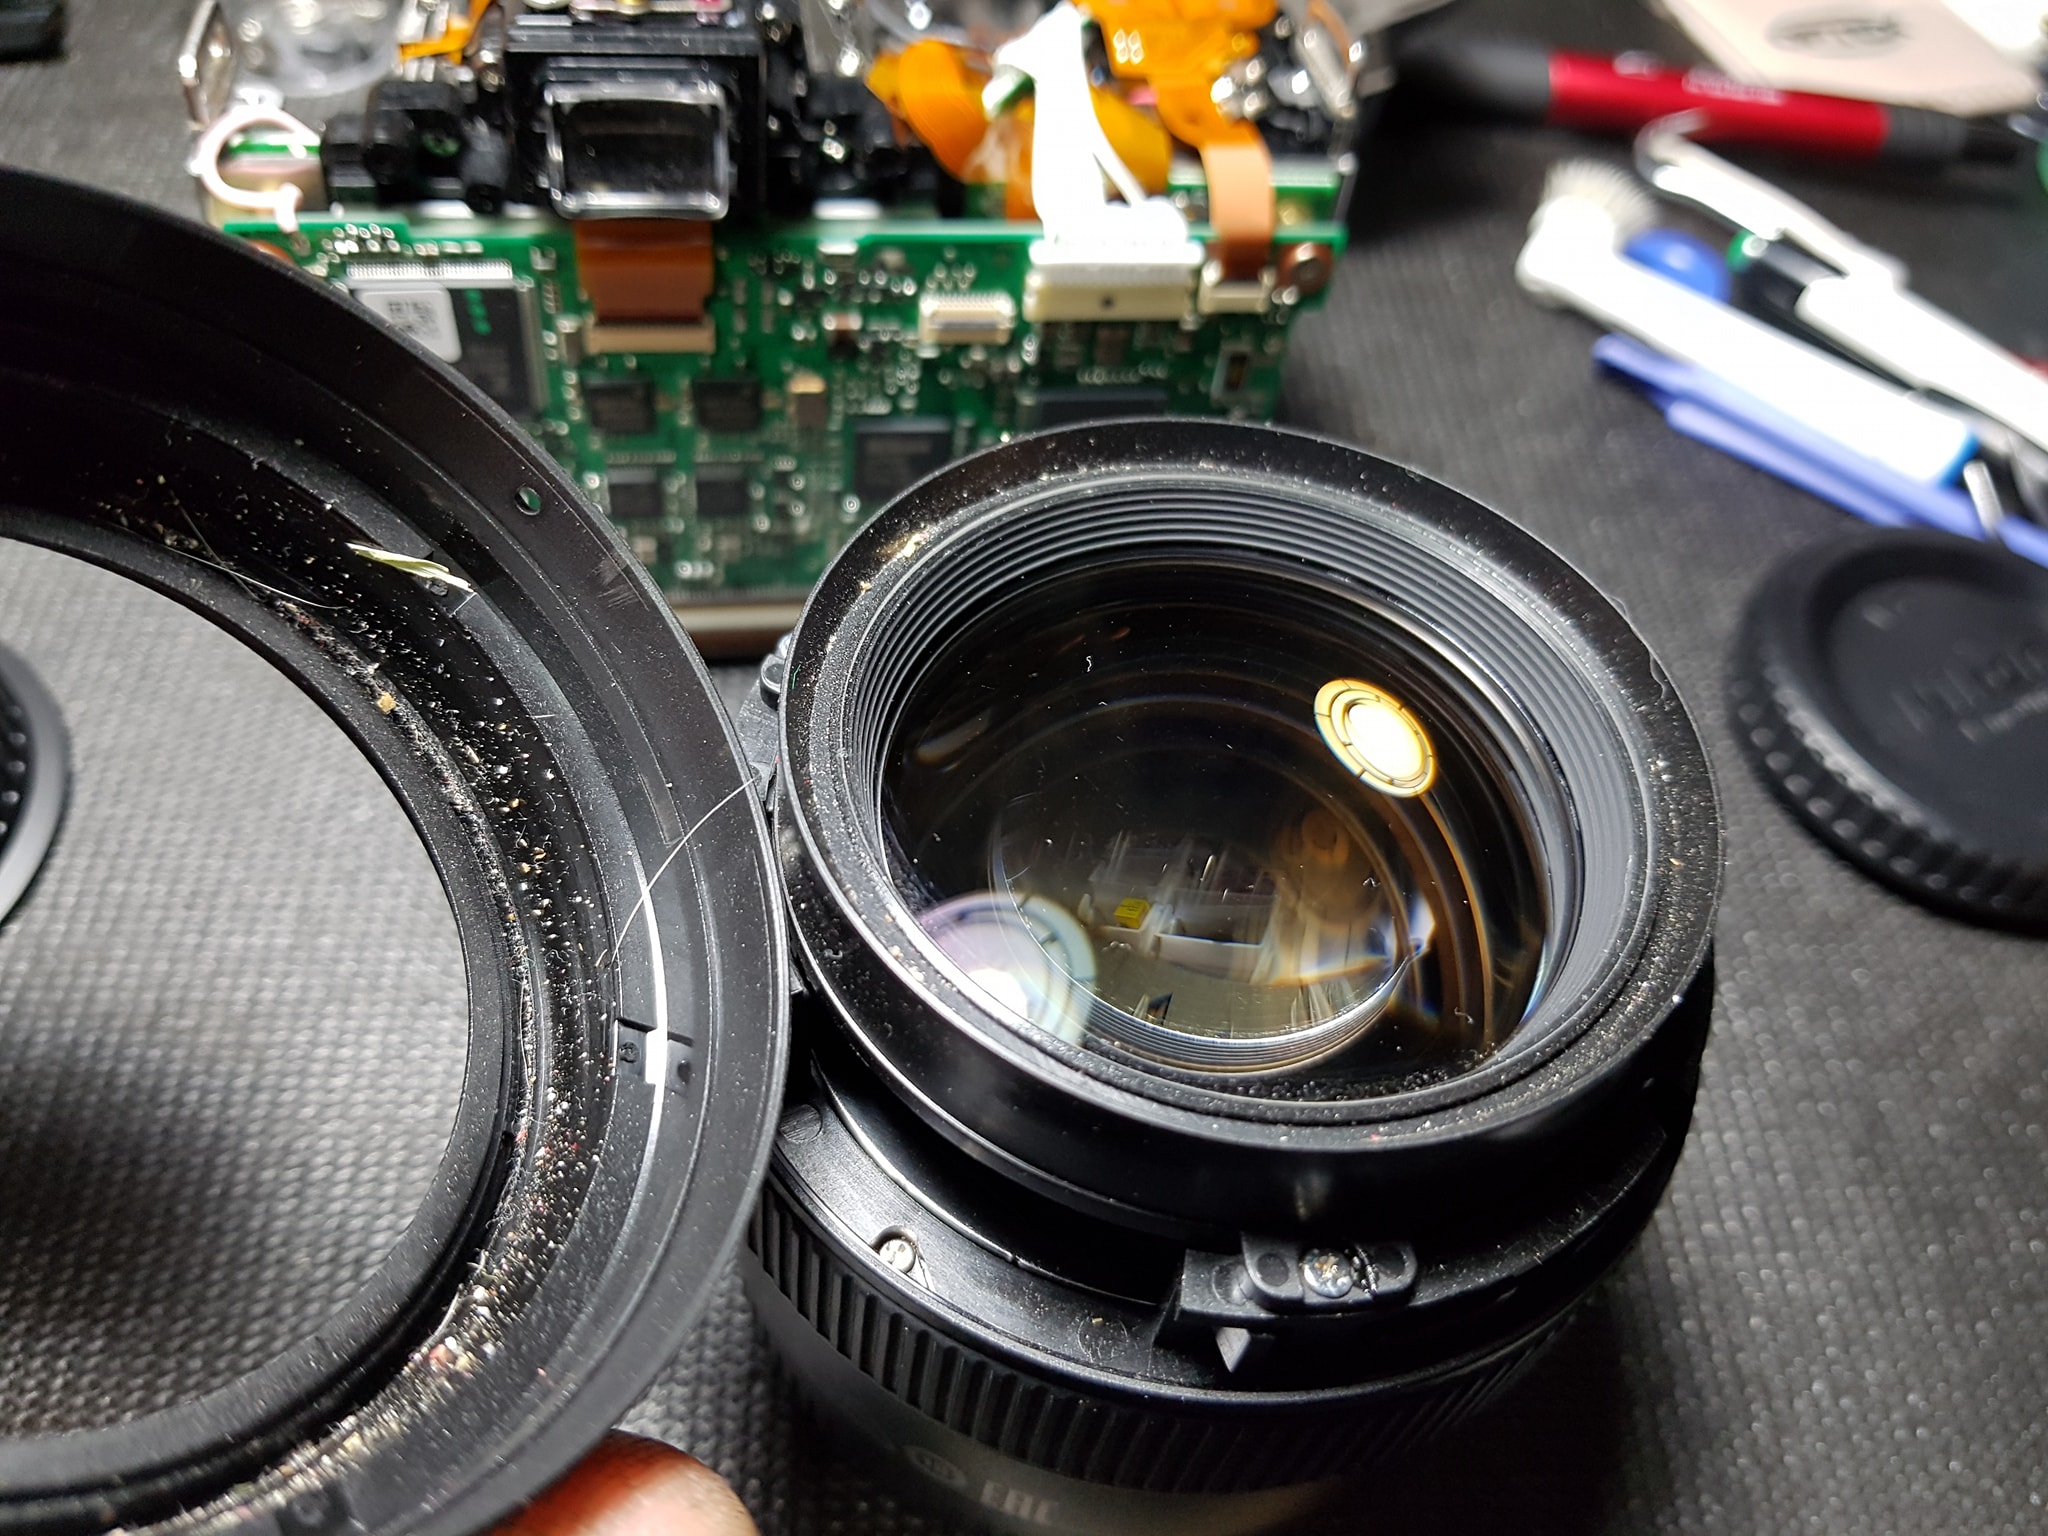
#### Step 2: Complete Disassembly and Element Extraction
This is the first real step. The lens must be fully torn down. This requires the correct lens spanners, a rubber suction cup tool, and a bench with controlled humidity (humidity ruins internal optics). I mark every helicoid thread with a paint pen for alignment. You remove retaining rings, extract the optical block, and separate the specific cell containing the damaged element.
#### Step 3: Element Replacement or Cement Group Separation
This is the heart of the operation.
- Simple Element: If it's a single element, you remove it. You must source an exact OEM replacement. Generic glass won't work. The curvature, refractive index, and Abbe number must match perfectly. You often have to buy a donor lens for parts. This is why laser damage camera lens repair can cost $200-$500. - Cemented Group: This is nasty. You place the damaged group in a heat bath or use a solvent to dissolve the old optical cement. You separate the two pieces of glass. You clean them perfectly (no dust, no fingerprints). You apply fresh UV-curing optical cement, carefully center the new element, and cure it under a UV lamp. The alignment has to be within microns. One mistake, and the lens has astigmatism.
#### Step 4: Reassembly and Optical Collimation
This is where experience separates the pros from the amateurs. You cannot just screw the lens back together. You must collimate it. You put the reassembled lens on an optical bench with a collimator (a telescope focused at infinity). You adjust the spacing of the elements until the image of a resolution target is perfectly sharp and centered. A zoom lens requires this at multiple focal lengths. It's tedious. It's math. It's the only way to make the lens truly sharp again.
#### Step 5: Testing and Verification
You put the lens on a camera. You shoot a brick wall at f/2.8 and f/8. You check for decentering (one side of the frame is sharper than the other). You check for flare. You check for the original burn spot. If you see any residual haze or a ghost of the burn, you didn't get all the damaged coating. You start over.
When You Must Replace the Entire Lens
Let's be real. Professional laser damaged camera lens repair is not cheap. It requires a technician with specialized equipment (collimators, ultrasonic cleaners, cement curing stations). For a kit lens (18-55mm, 24-70mm f/4), the repair cost often exceeds the used market value of the lens.
Seriously. I can't tell you how many times I've told a client, "The repair is $300. A used version of that lens is $250." In those cases, the professional thing to do isn't to repair it. It's to buy a replacement.
#### The Cost Equation
Here is a rough guide to when repair makes sense:
- High-end primes (50mm f/1.2, 85mm f/1.4, 24-70mm f/2.8): Absolutely repairable. The value is high. A $400 repair is worth it. - Vintage rare lenses (Leica, Canon FD, Nikkor AI-S): Repairable. Parts are hard to find, but the lens is irreplaceable. - Budget zooms (kit lenses): Throw it away. Buy a new one. It's cheaper and faster. - Internal zoom telephotos (70-200mm f/2.8): Repairable, but the labor is intense. Expect a high bill.
#### Avoiding the Scam Repairs
There are shops online that claim to "clean" laser burns. They charge $50. They are usually just wiping the lens with a chemical that does nothing. Some shops might try to re-coat the entire element. Re-coating is a valid process, but it requires the lens to be sent to a vacuum coating facility. That's a $1,000 minimum job. A cheap "repair" is a scam. The only two legitimate paths are replacement of the element or (rarely) micro-lapping with full re-coating. Do not accept a buffing service.
Common Questions About Laser Damaged Camera Lens Repair
#### Q: Can I remove the laser burn with hydrogen peroxide or acetone?
A: No. Absolutely not. The burn is a physical destruction of the coating, not a stain. You cannot dissolve a pit in glass with a chemical. You will only damage the surrounding good coating. Don't touch it.
#### Q: Are there any products that can fill the laser burn optically?
A: I have seen technicians use optical index-matching gel (like the gel used in fiber optics) to fill a micro-scratch, but this is a temporary fix for a lens that is being used in a lab, not for photography. The gel dries out, attracts dust, and the burn spot will return. It is not a permanent camera lens laser damage repair.
#### Q: What is the success rate of a professional repair?
A: If the damage is on a single, replaceable element, the success rate is near 100% if the technician is competent. If the damage requires cement group separation, the success rate drops to maybe 85%. There is always a risk of introducing dust or misalignment during a complex rebuild. A good shop will guarantee their work.
#### Q: How do I prevent this from happening again?
A: Never point a laser at a camera. Think of a lens like a magnifying glass. You are concentrating intense energy onto a tiny spot on the sensor and the glass. Also, use a UV filter on expensive front elements. A $50 filter can save a $500 element. A burned filter is simply thrown away. A burned lens element is a tragedy.
#### Q: Is it cheaper to buy a used lens or repair my damaged one?
A: As I mentioned earlier, for most consumer lenses under $500 (e.g., a Canon EF 50mm f/1.8 STM or a Sony 16-50mm kit lens), it is always cheaper to buy a clean, used copy. For professional-grade glass (e.g., a Canon 70-200mm f/2.8L or a Nikon 24-70mm f/2.8E), the repair is usually the most cost-effective route, as the used price is still very high.
This is a 48‑digit number that lets you regain access to your drive. It can also depend on if you want help for an issue. Get help for the account you use with microsoft. Our community is a collaborative place to learn about our products and ask questions! The type of support microsoft provides for consumers depends on the product you're calling about and if you have a product for home or for business use. Bring together all your relevant resources including copilot chat, files, pages,. Check out our most popular conversations! Find how to set up microsoft account, protect it, and use it to manage your services and subscriptions. Summary a bitlocker recovery key is needed when bitlocker can’t automatically unlock an encrypted drive in windows. Find solutions to common problems, or get help from a support agent.
Learn how to change the birthdate on a microsoft account. Our community is a collaborative place to learn about our products and ask questions! Bring together all your relevant resources including copilot chat, files, pages,. The type of support microsoft provides for consumers depends on the product you're calling about and if you have a product for home or for business use. Find how to set up microsoft account, protect it, and use it to manage your services and subscriptions. Get help with outlook for windows, the outlook app, outlook.com, and more. It can also depend on if you want help for an issue. Check out our most popular conversations! Get help for the account you use with microsoft. Summary a bitlocker recovery key is needed when bitlocker can’t automatically unlock an encrypted drive in windows.
Bring together all your relevant resources including copilot chat, files, pages,. It can also depend on if you want help for an issue. The type of support microsoft provides for consumers depends on the product you're calling about and if you have a product for home or for business use. Check out our most popular conversations! Summary a bitlocker recovery key is needed when bitlocker can’t automatically unlock an encrypted drive in windows. Find how to set up microsoft account, protect it, and use it to manage your services and subscriptions. This is a 48‑digit number that lets you regain access to your drive. Learn how to keep your microsoft account safe, including making a strong password, identifying safe emails, and reviewing account activity. Learn how to change the birthdate on a microsoft account. Find solutions to common problems, or get help from a support agent.
Summary a bitlocker recovery key is needed when bitlocker can’t automatically unlock an encrypted drive in windows. Learn how to keep your microsoft account safe, including making a strong password, identifying safe emails, and reviewing account activity. Bring together all your relevant resources including copilot chat, files, pages,. The type of support microsoft provides for consumers depends on the product you're calling about and if you have a product for home or for business use. Get help for the account you use with microsoft. Get help with outlook for windows, the outlook app, outlook.com, and more. Find how to set up microsoft account, protect it, and use it to manage your services and subscriptions. Learn how to change the birthdate on a microsoft account. This is a 48‑digit number that lets you regain access to your drive. Find solutions to common problems, or get help from a support agent.