
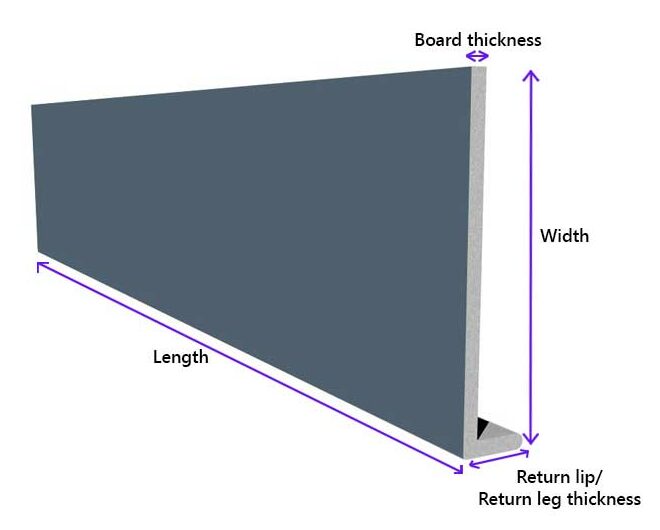
How to measure and cut fascia boards in mm for roofing
I still remember my first fascia job. Fresh out of trade school, armed with a tape measure and way too much confidence, I cut a twelve-foot board exactly three millimeters too short. That tiny gap—smaller than a pencil lead—cost me an entire afternoon of rework and a bruised ego. Here’s the thing about fascia boards: when you’re working in millimeters, precision isn’t just a nice-to-have. It’s everything. The difference between a roof that looks like it was built by a master and one that screams “amateur” is often less than the width of your fingernail.
So if you’ve ever found yourself staring at a chalk line wondering whether your measurements are actually accurate, you’re in the right place. This isn’t a textbook. This is the hard-won, dirt-under-your-nails reality of getting it right.
Why millimeters matter when measuring fascia boards
The roofing industry has moved on from the days of “close enough.” Modern building materials—especially engineered fascia boards like PVC, composite, or fiber cement—expand and contract differently than old-growth timber. If you cut too loose, you get ugly gaps that invite moisture. If you cut too tight, you get buckling on the first hot day. Seriously, I’ve seen boards pop right off their fasteners because someone didn’t account for thermal movement.
Here’s the math that keeps me honest: a standard PVC fascia board expands roughly 0.055 millimeters per meter for every degree Celsius of temperature change. On a black roof in July, that surface can hit 60 degrees above installation temperature. Do the calculation and you’re looking at several millimeters of movement across a single fascia run. Measure in inches and you’re rounding off the very tolerances that determine whether your install lasts twenty years or fails in two.
Honestly, working in millimeters forces you to slow down. It’s harder to fool yourself into thinking a gap is “close enough” when you’re staring at a metric tape. And that discipline carries through every other aspect of the job—from the cutting for fascia boards to the final caulking.
The tools you actually need (skip the junk)
Look—you don’t need a laser-guided mitre saw that costs more than your truck. But you do need the right gear if you want repeatable millimeter accuracy. Here’s my shortlist of non-negotiables:
- A metric tape measure that doesn’t stretch. I use a stainless steel one, 8 meters long, with clear markings down to the half-millimeter. Cheap cloth tapes are for sewing, not roofing. - A combination square with a metric edge. You’ll use this to transfer measurements and check your cuts before you pull the trigger. - A sharp pencil with a chisel point. Fat carpenter pencils rounded down to nothing give you false readings. Keep it sharp, keep it consistent. - A circular saw or mitre saw with a fine-tooth blade. For PVC and composite materials, use a blade with at least 60 teeth. Anything less and you’ll tear the edges. - A straightedge longer than your longest board. I prefer a 3-meter aluminum level. It doubles as a guide and a sanity check.
One more thing: get yourself a small notepad and a dedicated pencil that lives in your tool pouch. Write down every measurement twice—once when you take it, once after you’ve cut. It sounds paranoid. It’s saved me more times than I can count.
How to measure fascia boards with millimeter precision
The process starts before you even pull out your tape. Walk the entire roofline and look for framing inconsistencies. Old houses, in particular, rarely have perfectly straight eaves. You’ll find spots where the subfascia bows outward by 3 or 4 millimeters. If you measure only at the ends, you’ll cut a straight board that won’t fit a curved wall.
Start at the lowest point of the eave. Measure the run from the outside corner of the house to the outside corner of the opposite side. Do this at the top edge of the subfascia, not the bottom—the bottom often sags. Write that number down in millimeters. Now measure again at the midpoint. If the two readings differ by more than 5 millimeters, you have a bow you need to account for.
Here’s where the experts separate from the wannabes: measure the rise too. The fascia board sits at an angle that matches your roof pitch. For a standard 30-degree pitch, the vertical height of the board changes by roughly half its width when laid flat. Cut your board to the horizontal measurement, and it will be short on the angle. Always measure the actual fascia face length, not the eave length.
The “run and rise” method explained
This is the technique I use on every single job. It eliminates the most common error—cutting to the wrong plane.
1. Establish a datum line. Snap a chalk line along the entire eave, 20 millimeters below the top edge of the subfascia. This gives you a consistent reference point, even if the subfascia is wavy. 2. Measure the run (horizontal). From one outside corner to the other, along your datum line. Write it down. 3. Measure the rise (vertical). At each corner, measure from the datum line up to the roof deck. Average these two numbers. 4. Calculate the diagonal length. Use the formula: diagonal = square root of (run squared plus rise squared). Yes, it’s basic Pythagoras. Yes, it works every time.
If that sounds like too much math for a roofing job, I get it. But I promise you, after the second time you install a perfectly fitting fascia board on a tricky roof, you’ll never go back to guessing.
Cutting fascia boards in mm: Techniques that work
Alright, you’ve got your measurements. Now it’s time to cut fascia boards accurately. The cutting method depends on the material, but the principles are universal: measure twice, set the blade depth shallow, and let the saw do the work.
For PVC fascia, set your circular saw depth to just 3 millimeters deeper than the board thickness. Too deep and the blade grabs, causing chipping on the underside. For composite boards, use a scoring pass first—run the blade along the cut line without applying pressure, then make the full cut. This prevents the brittle outer layer from shattering.
Always cut with the finished face down. If the saw blade tears the material, the damage happens on the back side where it won’t be visible. This is one of those small tricks that separates a pro job from a weekend warrior mess.
Cutting miters and odd angles
Not every fascia run is a straight line. You’ll hit corners, valleys, and the occasional roofline that seems designed by a committee of drunk architects. For external corners, cut a 45-degree miter on each board. But here’s the kicker—the miter angle isn’t always exactly 45 degrees.
Measure the actual corner angle with a sliding bevel gauge. Transfer that angle to your saw. For a true 90-degree corner, the miter will be 45 degrees on each side. But old houses settle, and 88-degree corners aren’t uncommon. If you cut at 45 and force the fit, you’ll have a gap on the outside edge that no amount of caulk can hide.
For internal corners, I prefer a butt joint with a small return block. Cut the first board square, then cut the second board with a 45-degree back-cut that hides behind the first board. This allows for thermal expansion without creating an unsightly gap.
Common mistakes and how to fix them (before they become problems)
Every roofer I know has made at least one of these errors. The difference is whether you catch it before the board is nailed in place.
- Trusting the first measurement. Human error happens. Measure three times, cut once. I’m not joking. On a job last spring, I measured a 5.4-meter run as 5,400 mm. Perfect. Then I looked again. The actual measurement was 5,415 mm. That 15 millimeters would have left me 2 boards short and a client furious. - Forgetting the expansion gap. PVC and composite fascia need a 3-millimeter gap at every joint and every corner. If you butt them tight, they’ll buckle. I use a simple spacer—a scrap of 3-millimeter plywood—to set every joint consistently. - Cutting on the wrong side of the line. Mark your cut line, then always cut on the waste side. If your measurement is 3,250 mm, your mark goes at 3,250. The saw blade removes material, so cutting on the line shortens your board by the kerf width. Keep that blade on the waste side every time. - Not accounting for the saw kerf. Your saw blade removes material—typically 2 to 3 millimeters per cut. If you’re cutting a board to length, that kerf eats into your measurement. Always add half the kerf width to your workpiece length if you’re cutting between two marks.
Common Questions About How to measure and cut fascia boards in mm for roofing
What’s the best way to measure fascia boards on a roof with uneven eaves?
Use a straightedge longer than the entire run, or work in segments. Take measurements every 600 millimeters along the eave and record the smallest measurement. Cut your boards to that length, then scribe-fit each piece individually. It’s slower but guarantees a tight fit on wavy subfascia.
Can I cut fascia boards in mm with a standard imperial tape measure?
Technically yes, but it’s a terrible idea. Conversion errors multiply fast. A standard tape in inches has 16ths, 32nds, and 64ths—none of which translate cleanly to millimeters. Buy a metric tape. They cost ten bucks. They save you hours of frustration.
Should I cut fascia boards on the ground or on the roof?
Cut on the ground whenever possible. It’s safer, more accurate, and you can set up a proper cutting station. For long boards that won’t fit in a ground-level saw, use a circular saw with a straightedge guide while the board is supported on horses. Never cut a board balanced on a ladder.
How do I handle cutting fascia boards for a roof with multiple gables?
Treat each gable as its own independent run. Measure the fascia length for each face separately—don’t assume they’re identical, even if the plans say they are. I once found a 12-millimeter difference between two supposedly identical gables on a new construction home. Trust your tape, not the blueprints.
What expansion gap should I leave for PVC fascia boards in mm?
Industry standard is 3 millimeters per joint for PVC fascia installed in moderate climates. In areas with extreme temperature swings (deserts or northern Canada), increase that to 5 millimeters. Use a spacer block for consistency. Don’t guess.
Getting this right comes down to patience and repeatable process. Measure in millimeters because that’s the precision the material demands. Cut with a sharp blade and a steady hand. Check your fit before you fasten. It’s not glamorous work, but when you step back and see that clean, gap-free line of fascia running perfectly along the roofline, you’ll know exactly why the extra care mattered.
The fascia boards are the frame for your entire roof’s visual appeal. They’re the first thing people notice, even if they don’t know it. Mess them up, and every other detail looks wrong. Get them right, and the roof over your head will thank you for decades.