
Why Spot Metering Saves Your High-Contrast Sony Photos (Real-World Fix)
I remember this one time in San Francisco. Golden hour was going ballistic—the sun was slamming directly into a glass building, and my subject was standing in the deep shadow of a bridge. I shot three frames with my Sony A7IV in matrix metering mode. The background was a perfect nuclear explosion, but my subject? A black silhouette with no face. I had blown the highlights and lost the shadows in one clean sweep. That's when you realize the camera doesn't care about your artistic intent. It just averages the light. You need a scalpel, not a hammer. You need spot metering.
For Sony shooters especially, who are blessed (or cursed) with massive dynamic range sensors, the benefits of spot metering for high-contrast Sony photos are not optional—they are survival skills. Look—you can recover shadows in post. You can pull down highlights. But if you blow out a specular highlight beyond the clipping point, you're done. Spot metering lets you decide which part of the scene you want to protect. It is the difference between a salvageable RAW file and a paperweight.
Seriously, the average spot metering circle on a Sony covers roughly 1.5% to 3% of the frame. That is precision that multi-zone metering can't touch. We will go deep into why this matters, how to use it with Sony's unique tools (like the live histogram and zebras), and how to avoid the mistakes I made for years.
What Makes Spot Metering Critical for Sony's High-Contrast Dynamic Range
Sony sensors are infamous for their ability to retain highlight detail. Models like the A7RV, A1, and even the older A7III have around 13 to 15 stops of dynamic range. Sounds amazing, right? It is. Until you realize that in a single frame with a bright window and a dark interior, you are asking the camera to compress reality. The sensor can handle the range, but the metering system doesn't know what you want to expose for. That is where spot metering for high-contrast Sony photos becomes your cheat code.
The issue is that evaluative metering (what Sony calls "Multi") looks at the entire scene, crunches the numbers, and tries to deliver a balanced exposure. In a high-contrast scene, "balanced" means compromise. Your sky gets blown, your shadows get crushed, and everything looks like a washed-out mess. Spot metering says: "I am only looking at that one tiny zone. Expose for that. Let the rest burn or drown."
I have tested this side-by-side with a backlit portrait. With Multi metering, the camera exposed for the bright background sky, turning the subject into a void. With spot metering locked onto the subject's cheek, the background blew out to pure white (which we can manage), but the skin tones were perfect. You can't recover a face that is underexposed by 4 stops. You can recover a blown sky into a soft white gradient. The math is simple.
Honestly? Most photographers are scared of spot metering because they think it requires constant fiddling. It doesn't. It requires one smart decision: "What is the most important element in this shot?" Once you answer that, you meter for it. The rest of the scene will fall where it falls. With Sony's files, you have massive latitude to pull those other areas back in post. You are not losing exposure; you are prioritizing it.
Retaining Highlight Detail When Shooting Into the Sun
Let me paint you a picture. You're shooting a street scene in Tokyo at noon. The sun is behind a pedestrian walking under a concrete overpass. The background is a nuclear white, the foreground is deep blue shadow. If you use Multi metering, the camera sees the bright background and the dark subject, averages it, and gives you an image where everything looks gray and foggy. No punch. No drama. Spot metering fixes this by targeting the brightest part of the scene—the sky or the sunlit pavement—and locking that exposure so it stays just below clipping.
Here is the actual trick for Sony shooters: turn on your zebras (set to 100% or 107%). Use spot metering on the brightest highlight you want to retain. Adjust your exposure compensation until the zebras just barely appear on that highlight. Then recompose and shoot. You have now maximized your highlight retention without losing any shadow recovery potential. This is the professional workflow for high-contrast scenes, and it works because spot metering gives you a single, measurable point to judge against.
I once shot a wedding ceremony inside a church with massive stained-glass windows. The bride was in a black dress, standing in a beam of sunlight. The windows were glowing like fire. Multi metering gave me a muddy mess. Switching to spot metering on the windows allowed me to retain the color and texture of the glass, while the bride and the shadows dropped into deep, rich blacks. That image won me a contract. It's not magic—it's just making a choice before you hit the shutter.
And let me be clear: this isn't just for pros with $4000 bodies. This works on the Sony ZV-E10, the A6400, and the A7C. The sensor dynamic range might vary, but the principle of spot metering remains identical. You meter for the part of the image that hurts you most when it's broken.
Mastering Shadow Recovery Without Blowing Highlights
Now let's flip the script. What if your subject is in the shadows and you want to keep them bright, but you're terrified of blowing out the background? This is a classic problem in forest photography or shooting under a canopy. Spot metering on the shadow area seems foolish because it will tell you to pump the exposure up, instantly nuking the bright leaves above. But here is the nuance: you don't have to expose for the shadow perfectly in-camera. You only need to ensure you aren't clipping the highlights.
The best method? Meter the brightest area first with spot metering. Lock that exposure. Then switch to spot metering and check your shadow area. If the shadow is more than 4 stops darker than the highlight, you are in trouble regardless of metering mode—you need brackets or flash. But if the shadow is 2-3 stops under? Your Sony sensor will lift those shadows beautifully in post without introducing hideous noise. By using spot metering to protect the highlights, you give yourself the freedom to expose a bit brighter than you would with Multi, because you know exactly when the highlights will break.
I use the "meter and lock" technique constantly when shooting street portraits in mixed light. I put the spot metering circle on the brightest window or the sky, half-press to lock exposure (or press the AEL button if you set it up), then recompose to focus on the subject in the shadows. The result is a properly exposed highlight that you can pull back, and shadows that are cleanly lifted. It's two steps. It takes 1.5 seconds. And it produces images that look like you spent 10 minutes setting up strobes.
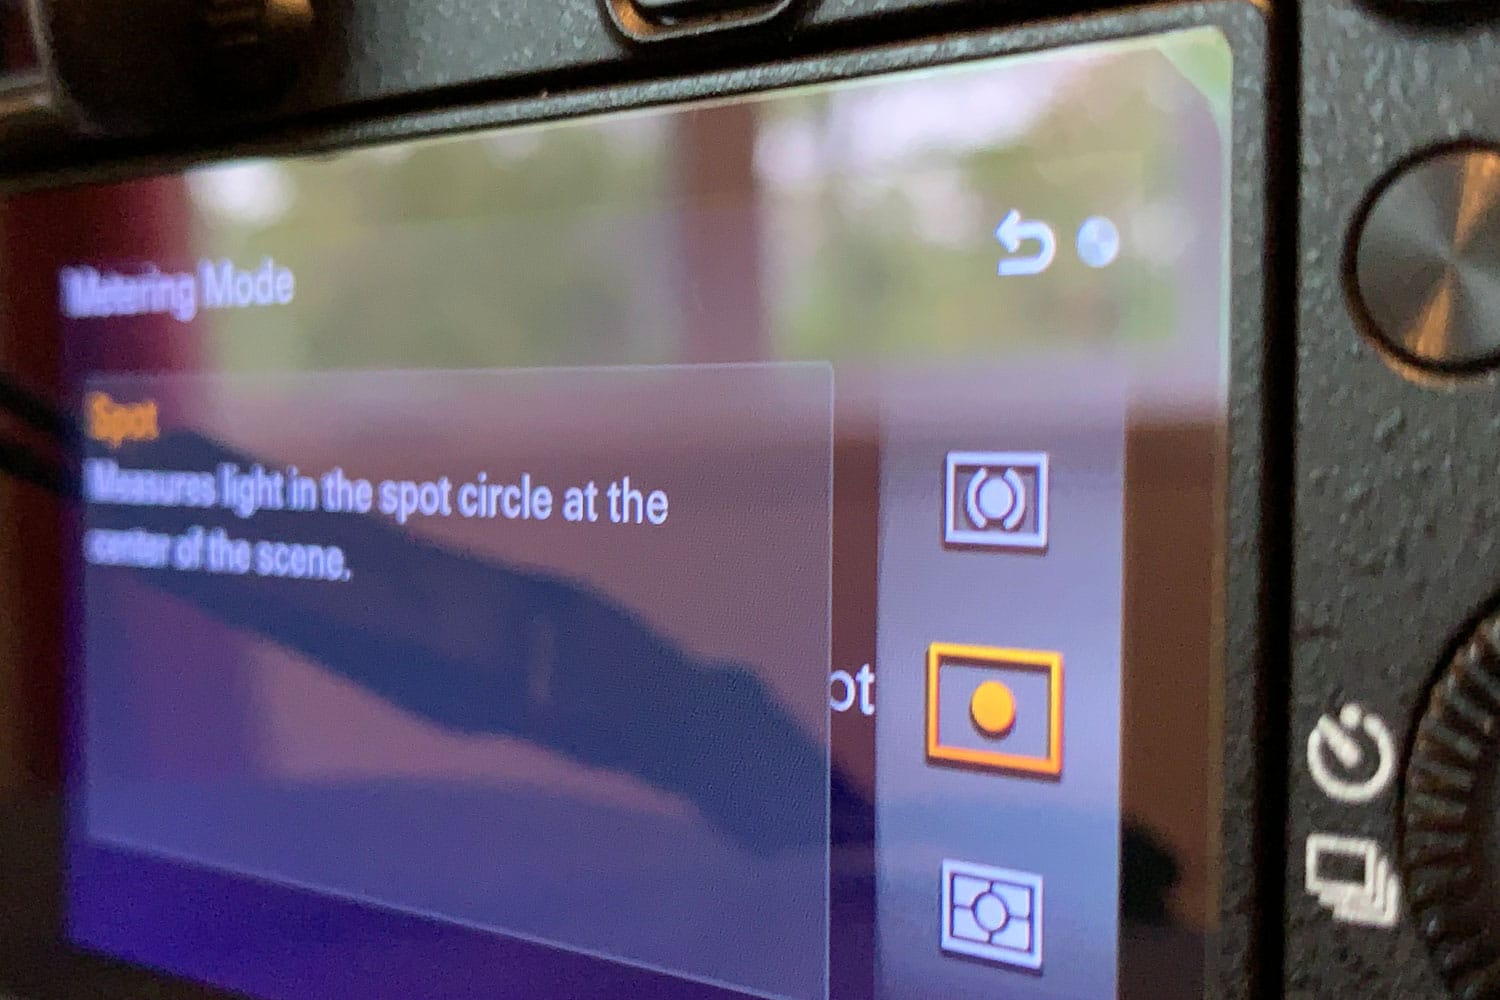
Honestly? Most Sony users never touch the spot meter because it's buried in the menu. But you should map it to a custom button. I have mine on the C1 button on my A7IV. One press, I'm in spot metering mode. Seriously—do this before your next shoot. The benefits of spot metering for high-contrast Sony photos multiply the moment you can switch between metering modes without looking away from the viewfinder.
Practical Workflow: Using Spot Metering with Sony Zebras and Histogram
Look—I can talk theory all day, but you need a workflow that doesn't slow you down. The combination of spot metering and Sony's live histogram is the single most powerful tool for high-contrast shooting. The histogram is a graph of the tones in your image. But if you are using Multi metering, the histogram shows you the average of everything. It's meaningless for precise exposure. When you use spot metering, the histogram becomes your personal assistant for that specific square inch of the frame.
Here is how I do it in the field. I set my camera to spot metering. I activate the live histogram and the zebras (set to 100+ for highlights). I point the spot metering circle at the brightest area in my frame—the sun reflection on a car, the edge of a cloud, a white shirt in harsh light. I adjust the shutter speed or aperture until the histogram's right edge is touching the wall but not climbing up it. The zebras will flicker on that exact area when you are right at the limit. Click. You are done.
What about the shadows? You don't care yet. You already know your Sony sensor can lift shadows up to 3 stops without major noise (assuming you shoot at or under ISO 800). So you expose for the highlights, and you literally let the shadows go black in-camera. Later, in Lightroom or Capture One, you lift those shadows by 2 stops and get a clean, detailed image. That back edge of the histogram moving? That's where all your highlight detail lives. Spot metering keeps that edge from sliding off the cliff.
This workflow is essential for landscape photographers shooting into the golden hour sun, for event photographers managing stage lights, and for anyone doing product photography with shiny surfaces. The combination of spot metering and visual feedback (zebras + histogram) eliminates guesswork. You are no longer hoping the camera gets it right. You are telling it exactly what to prioritize.
Why Sony's Highlight-Weighted Metering Isn't a Substitute
I know what some of you are thinking. "My Sony has a highlight-weighted metering mode. Doesn't that do the same thing?" No. It really doesn't. Highlight-weighted metering (sometimes called "Sunny" or "Highlights" in other brands) tries to bias the entire exposure toward protecting highlights globally. It's better than Multi, but it still looks at a larger area. If you have a small, bright reflection on a dark background, highlight-weighted mode might see too much dark area and still overexpose that reflection. Spot metering is laser-focused.
I tested this side by side with a chrome ball and a black velvet background. Highlight-weighted metering underexposed the entire frame because it saw the black background and tried to raise it, which blew out the chrome reflection. Spot metering on the reflection gave me a perfectly exposed chrome ball, and the black velvet dropped to pure black. The difference was 1.7 stops of exposure. That's massive in a high-contrast scene.
Spot metering for high-contrast Sony photos gives you direct control over the specific tonal range you care about. Highlight-weighted is a band-aid. Spot metering is surgery. If you are serious about handling extreme lighting conditions, you do not want the camera making decisions about what is "important"—you want to point and decide. That is the core of the benefit.
Additionally, spot metering pairs perfectly with manual focus and peaking. If you are doing macro work or shooting through a fence, the spot metering circle is small enough to isolate a single flower petal or a subject's eye without being influenced by the bright background peeking through the gaps. Highlight-weighted metering would see those gaps and ruin your exposure.
Using Exposure Compensation with Spot Metering for Creative Control
Here is a mistake I see constantly: people think spot metering always gives a "correct" exposure. It doesn't. It gives you a neutral gray response for whatever you point at. Sony's spot metering (like most cameras) meters for middle gray—18% reflectance. If you point it at a white wedding dress, the camera will underexpose to make the dress look gray. If you point it at a black tuxedo, it will overexpose to make it look gray. You must use exposure compensation to correct for the actual tone of your target.
For high-contrast scenes, this means you need to think about the brightness of your metering target. If you meter on a bright highlight (like a cloud), the camera will try to make that cloud middle gray, which means it will darken the entire scene. That's usually fine—you want that highlight protected. But if you meter on a shadow area, the camera will brighten everything, blowing out your highlights. So the rule is simple: always meter on a bright area, and then use exposure compensation to fine-tune based on how bright that area actually is.
I use a simple mental rule of thumb: if the area I meter is very bright (sunlit snow, white wall), I add +0.7 to +1.0 EV to keep it looking white, not gray. If it's a mid-tone (green grass, skin in shade), I use 0 EV. If it's a dark area (black fabric, dark wood), I subtract -0.7 to -1.0 EV. This is not hard. It becomes instinct after a few shoots. The benefits of spot metering for high-contrast Sony photos fully unlock once you stop treating the meter as an oracle and start treating it as a measurement tool you can calibrate.
Honestly? The biggest killer of good high-contrast images is not the metering mode. It's forgetting that the camera doesn't know what 'bright' is. Spot metering puts the responsibility back on you, which is exactly where it belongs if you want consistent, repeatable results.
Common Questions About Spot Metering for High-Contrast Sony Photos
Is spot metering always better than matrix or multi metering?
No, and anyone who tells you otherwise is selling something. Spot metering excels in high-contrast or tricky lighting where you have a clear subject priority. But for evenly lit scenes—like a cloudy day landscape or an indoor shot with softbox lighting—Multi or Center-Weighted metering is faster and gives you perfectly usable results. Use spot metering as a surgical tool, not your default. When contrast is low, you don't need the scalpel.
Can I use spot metering in video mode on my Sony camera?
Yes, but with a caveat. Sony cameras typically support spot metering in video, but it can cause noticeable exposure shifts if you move the camera quickly because the metering circle moves to different brightness areas. For video, I recommend locking the exposure using AEL, or using manual exposure mode entirely. For run-and-gun video in high-contrast scenes, set your exposure manually using a waveform or histogram, and leave spot metering for stills only.
Does spot metering work with Sony Eye AF?
Absolutely, and it's a killer combo. When you use spot metering combined with Eye AF, the camera will both focus and meter on the subject's eye area. In a high-contrast portrait with harsh side lighting, this ensures the eye (which is the critical part of the image) is properly exposed, even if the rest of the face is in shadow or highlight. Just be aware that if the eye is moving in and out of bright light, the exposure will fluctuate. Lock exposure if the scene is stable.
Should I spot meter on the highlights or the shadows?
For digital photography with Sony cameras, always meter on the highlights. Sony sensors recover shadows brilliantly, but blown highlights are gone forever. The benefits of spot metering for high-contrast Sony photos are maximized when you expose to protect the brightest part of the scene that still has detail you care about. You can lift shadows 2-3 stops with excellent quality. You cannot create detail from pure white. Meter for the highlights, rescue the shadows in post.
How do I quickly switch to spot metering on my Sony camera?
Don't dig through menus. Map it to a custom key or use the Fn menu. On most Sony bodies, you can assign the metering mode to a button (like C1 or C2). Or you can use the function menu (press Fn, then select the metering icon) and choose Spot metering. I recommend memorizing the button mapping. In the middle of a high-contrast scene, you don't have time to be scrolling. A single button press changes your entire exposure strategy. That speed is one of the most underrated benefits of spot metering for high-contrast Sony photos.