
Have you ever been stuck in a gymnasium or a corporate office, shooting under fluorescent lights, only to find your images look like they’ve been attacked by a weird, horizontal zebra pattern? That uneven brightness across the frame isn’t a glitch in your editing software. It’s flicker.
It's the nasty, pulsing inconsistency of artificial light that messes with your sensor's rolling shutter. You might not see it with your naked eye (your brain is a champ at smoothing that out), but your camera? It freaks out. That's why the anti-flicker setting exists. It's a specialized feature designed to detect the frequency of the ambient light and time your shutter release to sync perfectly with the peak brightness cycle.
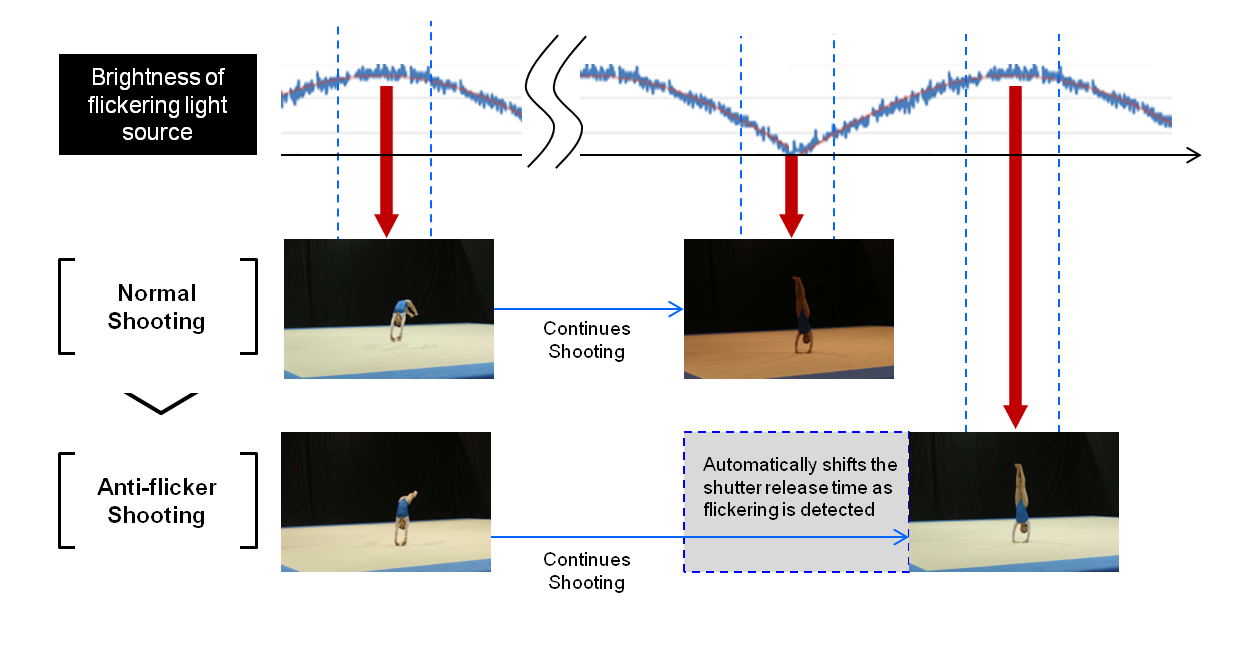
Honestly, before this feature became standard, we had to guess, shoot in burst mode, and pray one frame was usable. It was a nightmare. Now, almost every modern mirrorless camera and DSLR has some form of this, but not everyone understands how to leverage it without hurting their workflow. Let's break it down.
Why Your Camera Hates Fluorescent Lights (The Technical Guts)
To understand the anti-flicker setting, you first need to understand the enemy. Artificial lights—especially cheap LEDs, fluorescent tubes, and sodium vapor lamps—don't actually produce constant light. They pulse. They oscillate at the frequency of your local power grid. In the US and Canada, that's 60Hz (60 pulses per second). In Europe and most of Asia, it's 50Hz.
Your camera's sensor, when using an electronic shutter or even a fast mechanical shutter, reads the image from top to bottom (or side to side). If the light pulse cycles from bright to dark while the sensor is still reading the bottom half of the frame, you get that dreaded horizontal banding. It's inconsistent exposure across a single shot.
The anti-flicker setting is essentially a timing coordinator. When you engage it, the camera reads the flicker cycle and then delays the moment the shutter opens just enough to catch the peak of the brightness cycle. It's a small delay—microseconds—but it makes the entire frame uniformly lit.
But here's the kicker: this feature is not a one-size-fits-all magic bullet. It has trade-offs.
Understanding 50Hz vs. 60Hz: The Grid is the Boss
You can't just guess the frequency. If you're in a 60Hz country but shooting under lights that run at 50Hz (common with imported theatrical lighting), your anti-flicker setting needs to know. Most modern cameras let you manually select the frequency, or they offer an auto-detect mode.
Look—if you set your camera to 60Hz but the lights are running at 50Hz, the banding might shift to a different part of the frame, but it won't disappear completely. You'll still get artifacts. Always check your local grid standard, or better yet, shoot a test frame at a low shutter speed (like 1/60 or 1/50) to see if the banding vanishes.
Seriously, this is one of those settings where "Auto" is usually fine, but if you're getting weird results, flip to Manual and dial it in.
The Difference Between "Anti-Flicker" for Stills and Video
This is where a lot of photographers trip up. The anti-flicker setting behaves differently depending on whether you're capturing a still image or recording a movie.
For video, the camera needs to maintain a consistent shutter speed (usually 1/50 or 1/60 depending on frame rate) to match the power grid. If you shoot video at 24fps in a 60Hz country, you need a shutter speed of 1/60 (or a multiple) to kill the flicker. The setting here just locks that relationship.
For stills, the camera has more creative freedom. The anti-flicker setting actively delays the shutter timing. It might introduce a tiny amount of shutter lag. It also might slow down your continuous shooting speed. Why? Because the camera has to wait for the right moment in the light cycle to fire. If you're shooting sports at 10 frames per second, this setting can actually drop your frame rate significantly. It's a big deal.
When to Flip It On (And When to Leave It Off)
You don't want this setting active 100% of the time. Using it under natural light (sunlight) is pointless. It will still work, but you're introducing unnecessary processing and potential shutter lag for zero benefit. Save it for the artificial hellscapes.
Turn it ON when: - Shooting indoors under fluorescent or cheap LED lights. - Photographing concerts or stage performances with moving lights. - Filming video under any artificial light source. - Using electronic shutter (silent mode) in an office or gym.
Turn it OFF when: - Shooting in full sunlight or natural window light. - Using high-speed burst mode for action sports. - Using flash. (The anti-flicker setting can confuse the TTL metering and delay the flash sync.) - Shooting at very high shutter speeds (1/1000 or faster) where the single pulse cycle matters less.
Honestly, the biggest mistake I see is leaving this on for wedding receptions where you're mixing ambient indoor light with flash. The camera tries to time the ambient light, but then the flash fires, and the exposure goes haywire. It's a recipe for frustration.
Electronic Shutter vs. Mechanical Shutter: The Roller Coaster
The anti-flicker setting is most critical when using the electronic shutter. The rolling shutter effect (the way the sensor scans line by line) is extremely sensitive to flicker banding. With a mechanical shutter, the curtains move fast enough to sometimes mask the flicker, but it's not a sure thing.
If you're a street photographer using silent mode, you absolutely need the anti-flicker setting if you step inside a convenience store. Without it, your candid shot of someone buying a soda will have ugly horizontal stripes across their face. With it, the image looks natural, as if you were standing under the sun.
But here's the trade-off: electronic shutter can also introduce banding from non-light sources (like certain screens or strobes). The anti-flicker setting only compensates for the power grid frequency. It won't fix banding caused by a strobe going off at 1/200 of a second while your shutter rolls. That's a different beast entirely.
The Silent Mode Paradox
You'd think silent mode and the anti-flicker setting would be best friends. They are, but only if you're patient. When you enable anti-flicker with silent shutter, the camera might take an extra moment to "read" the light before it fires. This lag can make it feel like your camera is buffering.
If you're trying to capture a decisive moment (like a basketball player dunking), that tiny lag could cost you the shot. In that case, you might need to switch to mechanical shutter and disable anti-flicker, accepting that you might get a slightly uneven exposure on a few frames.
It's a balancing act. You're always trading perfect exposure consistency for speed.
The Biggest Misconception About Anti-Flicker
A lot of people think the anti-flicker setting will make their images look better in all artificial light. It won't fix color casts. It won't make green-tinted fluorescent lights look white. It only fixes the brightness inconsistency. The color rendering index (CRI) of the light remains the same.
If you're shooting under really terrible lights, you still need to white balance. The setting is purely for exposure uniformity. It's a technical fix, not an aesthetic one.
Also, if you use the "Fine Tune Exposure" or other auto-bracketing features, the anti-flicker setting can sometimes override your bracketing sequence. The camera prioritizes consistent exposure over the bracket interval. It's something to test before a paid job.
Common issues that are NOT fixed by anti-flicker: - Green or magenta color casts. - Vignetting from the lens. - Ghosting from slow sensor readout. - Banding from non-standard LEDs (some have internal drivers that flicker at 100Hz or 120Hz).
In those cases, your only option is a faster shutter speed (to freeze the flicker) or switching to a mechanical shutter.
Real-World Performance: Does It Slow You Down?
Yes, usually. I've tested this extensively on Sony, Canon, Nikon, and Fuji bodies. When the anti-flicker setting engages, the camera essentially acts like it's waiting for a "green light." It watches the light cycle, finds the peak, and then releases the shutter.
With a single shot, you might not notice the delay. It's maybe 16 milliseconds (one cycle of a 60Hz light). But in burst mode? The camera has to wait for the next peak. If you're shooting at 12fps, the camera might only fire at 10fps because it needs to sync every cycle. On some older bodies, the buffer also fills up faster because the processor is working harder.
But is that trade-off worth it? Absolutely, if you're in a controlled environment. A perfectly exposed, non-banded image is worth a slightly slower burst rate. You can't fix banding in post. You can live with a slightly lower frame rate.
Testing Your Specific Camera Body
Before a big shoot, do yourself a favor and test your specific camera. Not all implementations are equal.
- Canon: Their implementation is very aggressive and effective, but it can kill burst speed. - Sony: Often has separate settings for stills and video. You need to enable both manually. - Nikon: Usually handles this automatically very well, but the menu is buried deep. - Fujifilm: Their electronic shutter is notorious for banding; the anti-flicker setting is a lifesaver.
Take your camera, enter a room with flickering lights, and shoot a burst with the setting both ON and OFF. Look at the screen. You'll immediately see the difference. The ON sequence will look uniform; the OFF sequence will look like a striped mess.
- Set your shutter speed to 1/60 (for 60Hz regions) or 1/50 (for 50Hz).
- Enable the anti-flicker detection.
- Shoot a burst of 10 frames at the target.
- Review the images on a computer monitor at 100% crop.
- Look for any variation in brightness from top to bottom of the frame.
If you see variation, your camera isn't syncing perfectly. You may need to switch to mechanical shutter.
Common Questions About the Anti-Flicker Setting
Will the anti-flicker setting damage my camera if I leave it on?
No. It's a software-based timing adjustment. It won't damage any hardware. However, leaving it on unnecessarily might slightly increase power consumption because the sensor is actively analyzing the light cycle before each shot. It's negligible, but if you're shooting all day, it might cost you a dozen or two frames of battery life.
Does the anti-flicker setting work with flash photography?
Often, no. The flash duration is usually shorter than the flicker cycle. The camera might try to time the shutter to the ambient light, but then the flash fires and overpowers it. You can get inconsistent flash exposure or a delay in the flash sync. For flash work, always disable this setting.
Can I fix flicker banding in post-processing software?
It's very difficult. Some software (like Adobe Photoshop or Lightroom with the Deflicker plugin) can help with minor banding, but it's never perfect. You lose detail in the dark bands and often introduce artifacts. It's far better to get it right in camera with the anti-flicker setting.
Why does my video show flicker even with the setting enabled?
Your shutter speed likely isn't a multiple of the local frequency. For 60Hz, use 1/60 s or 1/125 s. For 50Hz, use 1/50 s or 1/100 s. If the setting is on but the shutter speed is wrong (e.g., 1/80 in a 60Hz country), you'll still see rolling flicker.
Is the anti-flicker setting the same on all camera brands?
Not at all. Some brands offer "High Frequency" anti-flicker for modern LED lights that pulse at 1000Hz. Others only offer the standard 50/60Hz detection. Check your specific model's manual for "Anti-Flicker Shooting" or "Flicker Reduction." They are functionally similar but the menu paths vary wildly.