
How to Solve a Combination Circuit Featuring Two Parallel Sections
You've probably been there. You're staring at a schematic that looks like a spider web of resistors, and your brain just wants to shut down. I've been in that exact spot. More times than I care to admit. The worst part? It's not a simple series circuit. It's not a pure parallel circuit. It's a combination circuit featuring two parallel sections, and that's where most people get tripped up.
Here's the truth: it looks scary. But it isn't. I've taught hundreds of technicians and engineers how to break these down, and once you see the pattern, it becomes almost mechanical. You don't need to be a math genius. You need a method. Let's build that method right now.
Understanding the Anatomy of a Combination Circuit with Two Parallel Sections
Before you touch a single formula, you need to see what you're actually looking at. A combination circuit is exactly what it sounds like—a mix of series and parallel connections. When we add two parallel sections, things get a little more layered, but the logic stays the same.
Look at the path of the current. It leaves the source, hits a junction, splits into one parallel group, then recombines. Then it hits another junction, splits again into the second parallel group, and finally comes back together to complete the loop. Seriously. That's the entire concept. It's like a highway with two separate detours. The current takes each branch, does its work, and meets back up with the main road.
Now here's the key mistake I see beginners make: they try to solve the whole thing at once. Don't. You can't. You have to push that instinct down and work section by section. Treat each parallel section as its own little problem. Solve it. Then move on. It works every time.
Identifying Where the Two Parallel Sections Actually Are
This sounds basic, but you'd be shocked how often people misidentify the boundaries. A parallel section is defined by nodes—points where the current has a choice. If a wire splits into two or more paths that eventually come back together, you've found a parallel section. If there's only one path through, it's series.
So here's what you do. Grab a highlighter. Trace the current from positive to negative. Every time you see a branch point that leads to multiple resistors that converge again, circle that entire group. That's one parallel section. Do it again for the second one. Now you've visually isolated them. It's a big deal because now the circuit looks like a few small blocks instead of one giant mess.
Honestly? If you can master this visual breakdown, you're already 70% done. The math is just arithmetic after that.
The Series Connection Between the Parallel Groups
Here's where the 'combination' part really shows up. In most circuits with two parallel sections, those sections aren't just floating in space. They're connected by a series segment—a single resistor or a wire that has no branching. This series piece carries the total current that comes out of the first parallel group and feeds it into the second parallel group.
Think of it like a water pipe system. You have a main pipe that splits into two smaller pipes (first parallel section), then those two smaller pipes merge back into a single pipe (the series element), and then that single pipe splits again into two more pipes (second parallel section). If you treat that series piece wrong, your entire calculation goes sideways. So don't skip it. It's part of the path.
The Step-by-Step Process for Solving Combination Circuits
Alright, let's get our hands dirty. I'm going to walk you through a process that I've refined over a decade of troubleshooting everything from simple classroom boards to industrial control panels. This isn't theory—this is field-tested stuff.
First, you need to simplify the circuit. Not the whole thing at once. Just the parallel sections. For each parallel group, calculate the equivalent resistance. Use the reciprocal formula: 1 / Req = 1/R1 + 1/R2 + 1/R3... for each branch in that section. Write that number down. Draw a new, simplified schematic where each parallel section becomes a single resistor. Now your scary monster circuit looks like a simple series string of maybe three or four resistors. You can handle that.
Second, calculate the total resistance of the simplified series circuit. Just add them up. That's your total circuit resistance. Use Ohm's Law to find the total current from the source: I = V / Rtotal. Now you have the big picture. But we're not done yet. We need to distribute that current back into the original parallel branches.
Let me pause here. This is the step where most people lose focus. They get the total current and think they're finished. You're not finished. You still need to find the voltage drops across each original component. You need to go backward through your simplification.
- First, find the voltage drop across each simplified block (which represents a parallel section) using Ohm's Law. Since it's series now, the current through each block is the total current. - Now, remember: that voltage drop you just calculated is the same across every branch inside that parallel section. That's the magic of parallel circuits. Voltage is constant across parallel branches. - Use that voltage and the original resistor values to find the individual branch currents. I = V / R for each branch.
And that's it. You've solved the combination circuit. You know total resistance, total current, voltage across each section, and current through every single resistor. It feels like cheating, but it's just methodical reduction.
How to Handle Unequal Branch Values in Each Section
In the real world, resistors don't always play nice. You won't always have two 100-ohm resistors in parallel. You might have a 100-ohm, a 220-ohm, and a 47-ohm resistor all in the same parallel section. The method doesn't change. Use the reciprocal formula. It works for any number of branches and any values.
Here's a practical tip. If you have exactly two resistors in a parallel branch, use the product-over-sum rule: (R1 * R2) / (R1 + R2). It's faster. But watch out—if you have more than two, you must use the reciprocal formula. Don't try to shortcut it. I've seen guys chain the product-over-sum for three resistors and it works, but it's clunky. Just use the reciprocal. It's cleaner.
Also, pay attention to the current distribution. The smallest resistor in a parallel section will always carry the most current. That's not a guess—that's physics. Lower resistance means easier path. If you're troubleshooting a circuit that keeps blowing a fuse, check the smallest resistor first. It's trying to do too much work.
Common Pitfalls When Analyzing Two Parallel Sections
Look—I've watched students and even seasoned techs make the same mistakes for years. Let's get them out in the open so you don't fall into the same holes.
The first mistake is forgetting that the total current changes after the first parallel section. When you simplify, you treat the entire circuit as series, but when you expand back out, each parallel section has its own voltage drop. If you assume the voltage is the same across both parallel sections, you're wrong. They are separated by a series element. That series element drops voltage. So the second parallel section sees a lower voltage than the first one. Always.
The second mistake is mixing up the equivalent resistance calculation. People sometimes add parallel resistors like series resistors. Don't do it. Parallel resistors always have an equivalent that is smaller than the smallest resistor in the group. If your Req comes out larger than any resistor in that parallel section, you made a calculation error. Go back and check.
The third mistake is neglecting the wire resistance in very low-voltage circuits. If you're working with 5V logic or battery-powered stuff, the wires themselves have resistance. In a combination circuit with two parallel sections, those tiny wire resistances add up and can throw off your calculations by a few percent. It's usually negligible, but in precision circuits, it matters. Measure the wire resistance and include it if needed.
Practical Application: A Simple Worked Example
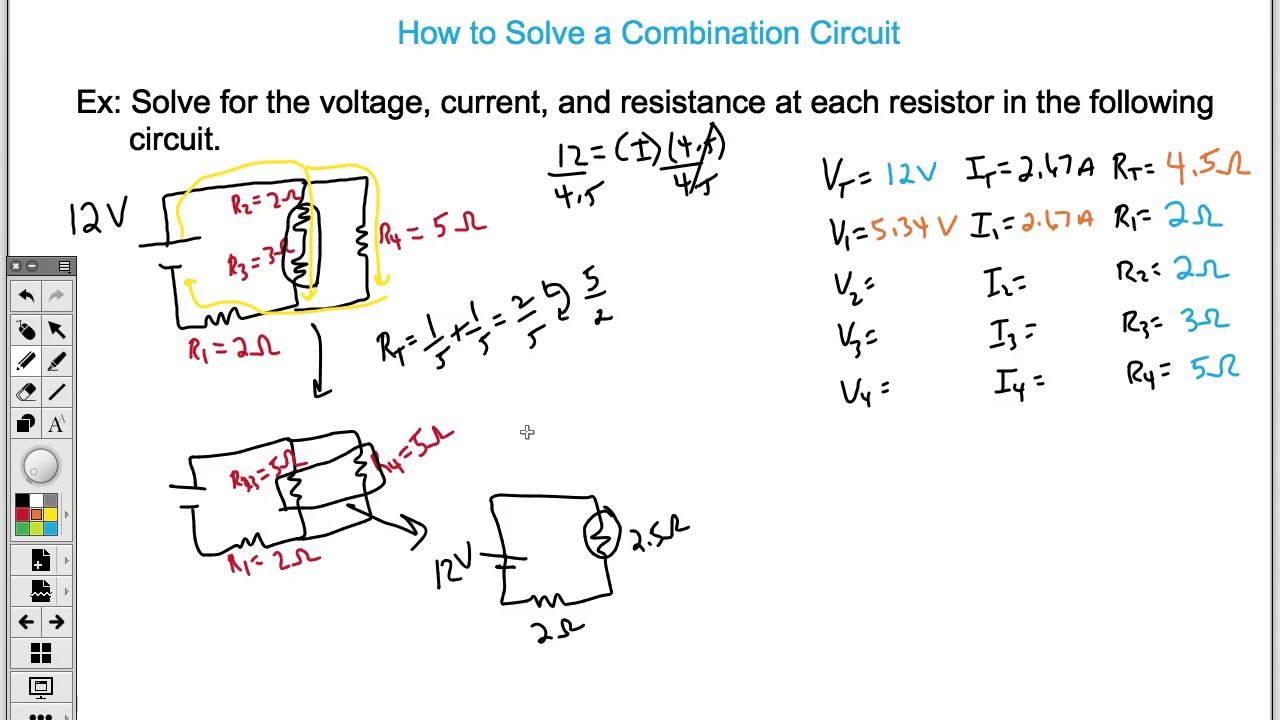
Let's put this into action so you can see it flow. Imagine a circuit with a 12V battery. The current flows through a 2-ohm resistor in series, then hits a parallel section with a 4-ohm and a 6-ohm resistor. After that, it flows through another 3-ohm series resistor, then hits a second parallel section with a 5-ohm and a 10-ohm resistor. Finally, it returns to the battery.
First, solve each parallel section. For the first section: Req1 = (4 6) / (4 + 6) = 24 / 10 = 2.4 ohms. For the second section: Req2 = (5 10) / (5 + 10) = 50 / 15 = 3.33 ohms (rounded).
Now your simplified series circuit is: 2 ohms + 2.4 ohms + 3 ohms + 3.33 ohms = 10.73 ohms total. Total current: I = 12V / 10.73 ohms = 1.12 amps.
Voltage across the first parallel block: V = 1.12 * 2.4 = 2.69V. So across the 4-ohm resistor, current is 2.69 / 4 = 0.67 amps. Across the 6-ohm resistor, current is 2.69 / 6 = 0.45 amps. Notice they add up to 1.12. Nice.
Voltage across the second parallel block: V = 1.12 * 3.33 = 3.73V. Across the 5-ohm: 3.73 / 5 = 0.75 amps. Across the 10-ohm: 3.73 / 10 = 0.37 amps. They add up to 1.12 again. Perfect.
You did it. You solved the entire combination circuit step by step. No magic. Just reduction and expansion.
Why This Method Works for Any Circuit Complexity
The beauty of this approach is that it scales. More parallel sections? No problem. More series elements between them? Handle them the same way. You can have a circuit with five or six parallel sections, and the process is identical. Simplify each parallel section to its equivalent, reduce the whole thing to series, calculate total values, then expand back out.
This is the fundamental technique of circuit analysis. It's not just for homework. It's for real-world troubleshooting. When a piece of equipment fails, you can mentally break the circuit into these blocks, measure voltages at key points, and figure out exactly which component is bad. I've saved hours of downtime using this exact method on factory floors.
The key is discipline. Don't jump ahead. Don't try to do the expansion while you're still simplifying. Write down each step. Use a pencil. Erase and redraw if you have to. The physical act of redrawing the circuit as a series string is what makes it click in your brain.
Tools and Tricks to Speed Up Your Analysis
If you're doing this by hand, a simple scientific calculator with a reciprocal button (1/x) will save you time. For the product-over-sum rule, you can do it in your head for common values. Two 10-ohm resistors in parallel give 5 ohms. Two 100-ohm resistors give 50 ohms. That becomes second nature after a while.
Here are a few quick reference rules that I use daily:
- Two equal resistors in parallel: Req = R / 2. - Three equal resistors in parallel: Req = R / 3. - A resistor in parallel with a much larger resistor: Req is slightly less than the smaller resistor. - A resistor in parallel with a much smaller resistor: Req is slightly less than the smaller resistor.
If you have access to a multimeter, you can always verify your calculations. Measure the actual voltage across each parallel section. It should match your calculated value within a reasonable tolerance. If it doesn't, either your math is wrong, or there's a fault in the circuit. That's your moment to dig deeper.
Common Questions About Solving a Combination Circuit Featuring Two Parallel Sections
How do I know if my equivalent resistance calculation is correct?
Always check that your equivalent resistance for any parallel section is smaller than the smallest resistor in that group. If it's not, you made an error. Also, use the reciprocal formula carefully and double-check your arithmetic.Can I use the product-over-sum rule for more than two resistors in a parallel branch?
Technically, you can chain the product-over-sum rule across multiple resistors, but it's error-prone. It's safer to use the reciprocal formula for three or more resistors. The reciprocal method works for any number of resistors and is less likely to lead to mistakes.What happens if one of the parallel branches has a short circuit?
If a branch has zero resistance (a short), that entire parallel section becomes a short circuit. The equivalent resistance of that section is essentially zero ohms. The total circuit current will spike dramatically, and you'll likely blow a fuse or damage components. This is a common fault scenario, and recognizing it quickly is a valuable troubleshooting skill.Do I always have to redraw the circuit?
No, but it helps enormously, especially when you're learning. Experienced engineers can visualize the simplification process in their heads. But even I will sketch a quick redraw for a complex circuit. It eliminates mental clutter and ensures you don't miss a series element between parallel sections.How does this method apply to AC circuits?
The same fundamental concepts apply, but you replace resistance with impedance. Each parallel branch has impedance that includes resistance and reactance. You calculate the equivalent impedance using the same reciprocal formula, but with complex numbers. It's more mathematically intensive, but the logical flow of simplifying the parallel sections and then expanding back is identical.It's a rewarding feeling the first time you successfully analyze a combination circuit with two parallel sections without any help. You realize it's just a puzzle. A satisfying, logical puzzle. And now you have the key to solve it every single time.