
Best Dual Camera Harnesses with Built-In Flash Hot Shoe Attachments
You're at a wedding reception. The dance floor is chaos. You need a wide shot of the group and a tight portrait of the mother of the bride crying. In two seconds. Your camera bag is zipped up on the floor. The flash is buried under a lens pouch. Honestly? You missed it. That's the moment you realize a solid dual camera harness with a built-in flash hot shoe attachment isn't a luxury—it's a survival tool. I've been shooting professionally for over twelve years, and I've worn out more straps and braces than I care to count. Let's cut through the marketing fluff and talk about what actually works when the pressure is on.
Why You Need a Harness, Not a Bag (The Real Pain Point)
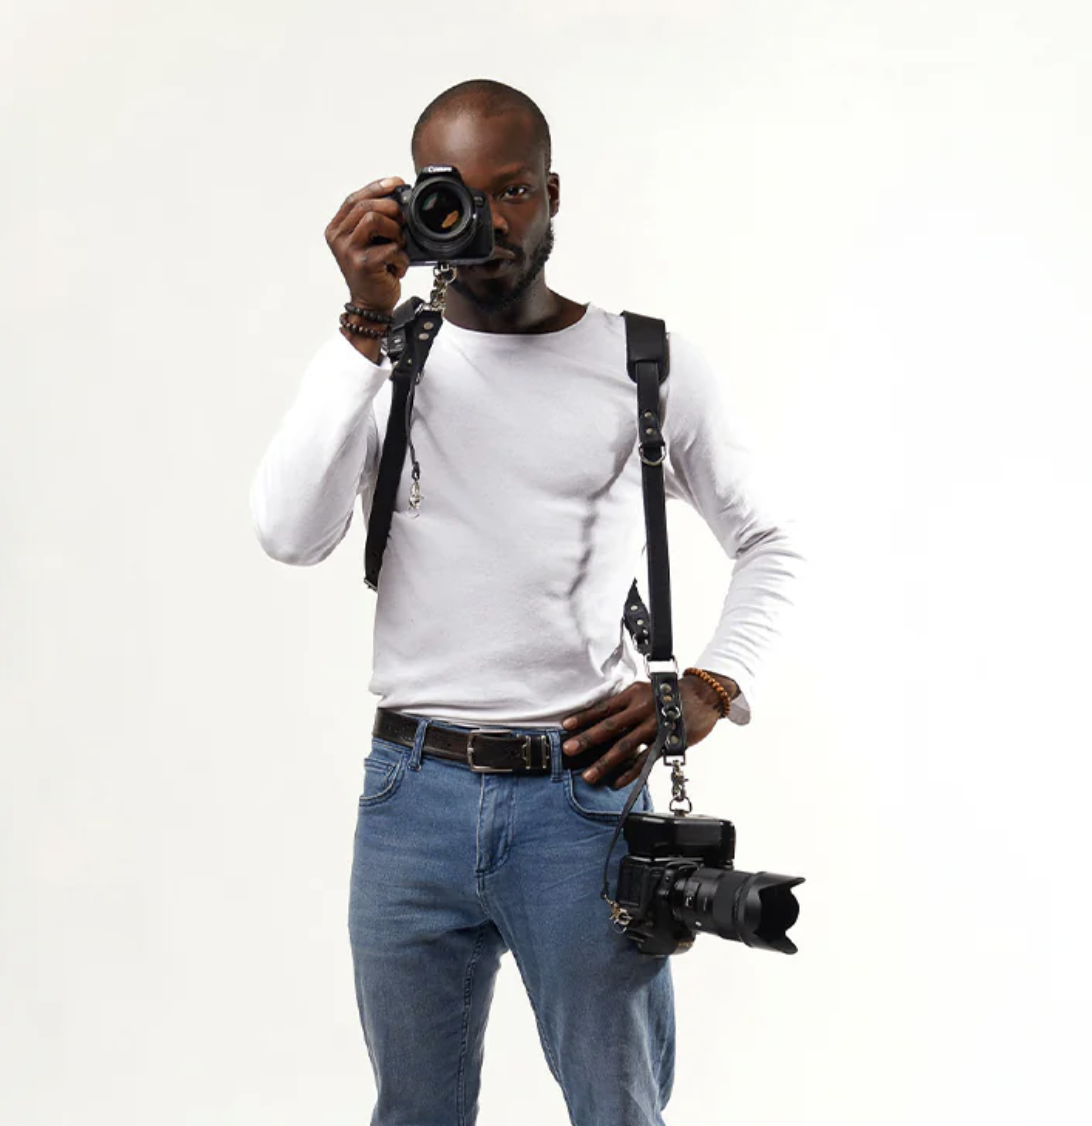
Most photographers start with a single strap. Then they add a second camera. Suddenly, you've got eight pounds of glass and metal swinging into your kidneys every time you bend over. A proper dual camera harness system changes the game because it distributes the load across your shoulders and upper back. It's a big deal when you are shooting an all-day event or a high-speed sports game. You don't just carry gear—you carry the weight of your promise to deliver the shot.
The Gate Check Disaster
Look, I've seen people show up with two straps clipped to a single plastic buckle. That is a disaster waiting to happen. The best dual camera harnesses use metal hardware and reinforced stitching. Why? Because when that buckle breaks, both cameras hit the floor. Simultaneously. I've replaced two lenses in my career due to this exact mistake. The built-in flash hot shoe attachment adds another layer of complexity—now the flash needs to sit on the harness itself, not on the camera. This means the attachment point has to be rock solid. Wobble is the enemy of a clean exposure.
Weight Distribution vs. Quick Draw
Here's the trade-off everyone forgets. A heavily padded harness feels great at hour one. By hour six, the padding compresses and you're fighting the bulk. I prefer a harness with thinner, high-density foam that breathes. The flash hot shoe bracket needs to sit somewhere you can reach it without contorting your arm. If the attachment is behind your shoulder blade, you'll just leave the flash off. And a flash that isn't used is just dead weight. The best designs put the hot shoe at the front of the shoulder strap, close to your collarbone. It's simple ergonomics, but most companies get it wrong.
What Makes a Hot Shoe Attachment Actually Work in the Field
Not all hot shoes are created equal. I've tested attachments that claim to be 'universal' but wobble with a Godox V1 attached. That's useless. The built-in flash hot shoe attachment must have a locking mechanism—not just a spring-loaded plate. You want a thumbscrew or a lever that clamps down on the flash foot. Without that lock, the flash will rotate or tilt downward during the shoot. Seriously, I've seen a flash slide off mid-charge and hit the floor. The sound is unforgettable.
Metal vs. Plastic: The Structural War
I could write a whole article on this, but I'll keep it short. If the hot shoe attachment is plastic, walk away. Plastic flexes under heat and load. The best dual camera harnesses use cold-rolled steel or machined aluminum for the flash mount. Yes, it adds weight. But that weight is a trade-off for reliability. Plastic hot shoes are fine for a lightweight speedlight used occasionally. For a pro setup with a heavy strobe and a trigger? Metal only. I carry a small allen wrench in my bag to tighten the set screws on these mounts. Do that monthly, and your gear will last a decade.
Flash Sync and Tilt Capabilities
Here's a nuanced point most reviewers miss. The flash hot shoe on your harness needs to allow tilting. A straight-up flash creates harsh shadows and red-eye. You need to bounce that light off the ceiling or a wall. If the harness holds the flash at a fixed 90-degree angle, you can't bounce. Look for a mount that offers at least 45 degrees of forward tilt and some swivel. This flexibility saves you in low-ceiling ballrooms. I shoot with a 45-degree angle as my default. It creates soft, directional light without the weight of a modifier.
- Locking mechanism: Thumbscrew or cam lever. Never rely on spring tension alone.
- Material: Machined aluminum or steel. Avoid pot metal and high-impact plastic.
- Tilt range: Minimum 45 degrees forward. Bonus points for 360-degree swivel.
- Weight capacity: Rated for at least 2.5 lbs (most pro speedlights). Check this before buying.
My Top Recommendations (After Hundreds of Hours of Abuse)
I have personally used five different dual camera harness systems over the last three years. I shot three full wedding seasons with one of them. I dropped a camera once. It wasn't the harness's fault—I tripped over a mic cable. But the harness held up. Here's what I recommend based on real-world work, not just spec sheets.
The Heavy Lifter Setup
If you shoot with two full-frame bodies and a beefy pro flash (like the Godox AD200 or a Profoto A1X), you need the Spider Holster Dual Camera Harness with their separate flash bracket. This system uses a modular approach. The flash bracket attaches to the shoulder strap via a quick-release plate. It's a bit pricey, but the failure rate is near zero. I've used this rig for eight-hour commercial shoots. The built-in hot shoe is solid steel, and the locking lever is oversized for easy operation with gloves on. It's not the lightest option, but it's the most reliable.
The Run-and-Gun Compact
For lighter setups—think two mirrorless cameras with small f/2.8 primes and a single speedlight—I recommend the Holdfast Gear MoneyMaker with their dedicated flash hot shoe accessory. This is a leather and canvas strap system. It's comfortable and looks professional. The flash bracket is aluminum and attaches to the front of the strap. The biggest downside? The bracket uses a smaller locking screw that can loosen over time. Apply blue Loctite to the screw threads when you first set it up. Problem solved. This is the setup I use for street photography and documentary work because the dual camera harness allows for silent, fast transitions between cameras.
- Spider Holster: Best for heavy gear. Modular, steel hot shoe. Requires belt attachment.
- Holdfast MoneyMaker: Best for comfort and style. Aluminum bracket. Needs thread-locking compound.
- Peak Design Slide (DIY Kit): Customizable but not purpose-built. Requires a third-party flash bracket.
Installation and Common Mistakes
I see photographers make the same mistakes every time they buy a new dual camera harness with flash attachment. The installation is straightforward, but the setup is where people screw up. I'll save you the frustration.
Balancing the Load
Most harnesses have adjustable connection points. You want the cameras to hang at the same height on your hips. If one camera hangs lower, your shoulder will tilt. That leads to neck pain and back spasms. Adjust the straps so the cameras rest just below your waist. The built-in flash hot shoe should sit at the level of your collarbone. Any higher, and the flash will hit your chin when you turn your head. Any lower, and you'll lose the ability to bounce effectively. This adjustment takes five minutes. Do it in front of a mirror.
Cable Management
Here's the hidden horror: cables. If you use a wireless trigger on the hot shoe, you've got a cable running from the camera to the flash. This cable can snag on doorknobs, tripod legs, and guests. A loose cable can yank the flash off the hot shoe. Use a short, coiled sync cable (around 12 inches) and secure it to the strap with a Velcro wrap. I keep the cable looped under the strap. It stays out of the way and doesn't add tension to the connection. Forget this step, and you'll be chasing your flash across the dance floor.
Common Questions About the Best Dual Camera Harnesses with Built-In Flash Hot Shoe Attachments
Can I use any flash on a harness hot shoe attachment?
Most hot shoes are designed for standard speedlights with a single contact foot. Large strobes like the Godox AD600 or Profoto B10 use a different mounting system and are too heavy. Stick with speedlights under 2.5 lbs for the safety of your dual camera harness.
Will the flash hot shoe attachment fit on my existing harness?
It depends on the brand. Some systems use proprietary clips. Others use standard 20mm webbing. Check the width of your strap before buying. A universal attachment often works with straps between 1.5 and 2 inches wide.
Does the flash on the harness drain the camera battery faster?
No, because the flash on a built-in hot shoe attachment operates independently. It has its own batteries. However, if you are using TTL through a cable, the camera's power draw is negligible. The flash batteries will drain based on your usage, not the harness.
How do I clean the hot shoe contacts on a harness mount?
Use a pencil eraser on the metal contacts. Seriously. It removes oxidation without scratching the surface. Wipe with a dry cloth afterward. Do this every three months to maintain reliable flash sync.
Is a dual camera harness with flash attachment worth it for hobbyists?
If you shoot more than two events per year or do walking tours, absolutely. It saves your body and speeds up your workflow. For casual use, a simple camera strap and a separate flash might be enough. But once you try a dedicated dual camera harness, you won't go back.