
Identifying Sensor Spots in High-Aperture Photos
Ever been reviewing a beautiful portrait shot at f/1.4 and noticed a ghostly smudge in the sky? You're not alone. That's the moment your heart sinks, because you know exactly what it is. Identifying sensor spots in high-aperture photos is one of those skills that separates the pros who clean their gear weekly from the folks who just clone-stamp their way through every edit. And honestly? It's not hard. But it does require understanding why those little bastards show up when your lens is wide open and vanish when you stop down.
Look—I've been doing this for over a decade. I've seen dust mites that looked like small continents on a sensor map. I've watched photographers panic because they thought their 50mm f/1.2 was broken. Spoiler: it wasn't the lens. It was almost always dirt on the sensor. So let's talk about how to spot these spots, why they behave differently at wide apertures, and what you can actually do about it.
Seriously, if you shoot portraits, weddings, or any low-light work, this is fundamental. You can't afford to miss it. Let's get into the nitty-gritty.
The Optical Truth: Why Your Lens Wide Open Is a Dust Detector
Aperture Blades and the Shadow Game
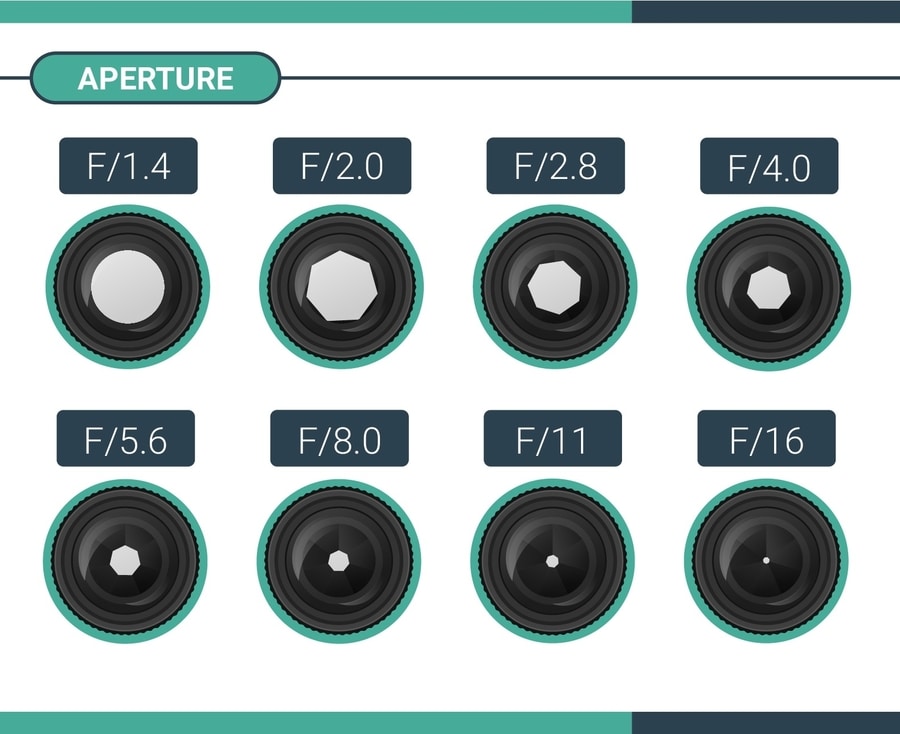
Here's the physics you need to understand, and I'll keep it painless. When you're shooting at f/1.4 or f/2.8, the aperture blades in your lens are fully retracted. That means you're using the entire surface area of the lens to funnel light onto the sensor. But here's the kicker—when the aperture is wide open, the light cones hitting the sensor are coming from a much shallower angle. This creates a perfect environment for sensor dust to cast hard, visible shadows.
Think of it like this: hold your hand close to a wall under a bright overhead light. The shadow is soft and diffuse. Now move your hand away from the wall—the shadow gets sharper and more defined. That's exactly what happens with dust spots on your sensor at wide apertures. The dust particles are sitting on the sensor's protective filter, and the light from the lens is coming in at an angle that makes each speck cast a crisp, dark shadow. Stop down to f/11, and the light straightens out. The shadows soften or disappear entirely.
It's a classic trick of optics. And it's why many photographers never even know they have sensor dust until they shoot a sky scene at f/1.8. Then they see it. A whole constellation of grime. It's maddening.
Why f/16 Hides What f/1.4 Reveals
People often ask me, “But I checked at f/16 and didn't see anything!” Exactly. That's the point. At small apertures, the depth of field is enormous, and the light rays are more collimated. The dust particles become invisible because their shadows are spread so thin across the sensor's pixels that they blend into the background exposure. There's no contrast. No hard edge.
This is the exact reason why identifying sensor spots in high-aperture photos requires a deliberate testing method. You can't just take a shot of a white wall at f/22 and expect to see dust clearly. You'll see maybe the biggest pieces. But the smaller, more insidious specks? They'll be invisible. Then you go shoot a wedding reception at f/2.0, and suddenly you've got a dozen little gray smudges on every single bridal portrait. It's a disaster.
And here's the thing—those spots aren't always dust. Sometimes they're tiny oil droplets from the shutter mechanism. Sometimes they're dried water spots. Sometimes it's just the universe laughing at you. But no matter the source, the method for finding them is the same. You need to test at a wide aperture.
The Practical Method: How to Actually See the Dust
The Sky Shot Technique (Seriously, It Works)
I've been using the same trick for years, and it never fails. Go outside. Point your camera at a clear, featureless section of sky—ideally during the golden hour when the light is even but not harsh. Set your lens to manual focus and blur it completely. You don't want any texture in the sky. Then set your aperture to the widest your lens allows, usually f/1.4 to f/2.8. Shoot at a shutter speed that gives you a middle-gray exposure.
Now bring that image into your computer. Crank the contrast slider to max. Invert the image if you feel fancy. What you'll see is a map of every single piece of debris on your sensor. Seriously. It's like a crime scene investigation for your camera. The spots will appear as dark, sharp circles or irregular blobs against the bright sky.
This is the gold standard for finding sensor dust. It's reliable, repeatable, and takes about two minutes. I do it before every wedding shoot. Every portrait session. And you should too. Because once you know what you're dealing with, you can decide how to handle it. But first, you need to identify the spots. Without this method, you're flying blind.
Software Clues and the Clone Stamp Temptation
Look—you can also spot sensor dust in your editing software without the sky test. Pay attention during culling. If you see the same blurry smudge in the same position across multiple images, that's a dead giveaway. It's not a bird. It's not a lens flare. It's dirt. Dust spots in photography tend to appear in the same relative area of the frame, especially if you're using the same lens and focal length.
But here's the temptation that gets everyone: cloning them out. And yes, if you have one or two small spots on a single image, go ahead. Clone stamp or spot healing brush. Easy fix. But if you're shooting a 300-photo wedding and every single frame has six dust spots? That's hours of retouching. That's a waste of your life. The correct move is to clean the sensor, not edit around the problem.
I cannot tell you how many photographers I've met who simply accept dust as a fact of life and spend an extra forty minutes per shoot in post-production. That's insane. It's like having a pebble in your shoe and deciding to just walk funny instead of taking the pebble out. Clean the sensor. It's faster. It's better. And it's the professional thing to do.
The Big Misconception: Stopping Down to Find Dust
Why That's Backwards (and a Waste of Time)
I hear this all the time: “I shot a white wall at f/22 and couldn't see any dust, so my sensor is clean.” No. Just no. That test is virtually useless for identifying sensor spots in high-aperture photos. Remember what I said about light angles? At f/22, the aperture blades are almost fully closed, creating a pinhole effect. The light hitting the sensor is nearly perpendicular. Dust particles don't cast shadows in that scenario. They're essentially invisible.
You're not finding dust at f/22. You're finding your own ignorance. And I don't mean that harshly—I mean we've all done it. I did it when I was starting out. I thought my sensor was pristine because a stopped-down test looked clean. Then I shot a beach scene at f/1.8 and wondered why the sky looked like it had measles. It's a rite of passage. But now you know better.
The truth is, if you want to see dust, you need to open the aperture as wide as possible. Don't stop down. Open up. That's the rule. Write it on a sticky note and put it on your camera strap. Wide aperture sensor spots are the ones that cause the most trouble in real-world shooting, so those are the ones you need to detect first.
The Diffraction Factor Nobody Talks About
There's another layer to this that rarely gets discussed: diffraction. When you stop down to very small apertures like f/16 or f/22, diffraction kicks in and softens your entire image. That softening can actually mask dust spots further, because the edges of the shadows become blurred and indistinct. So not only are the shadows weaker, they're also less defined. It's a double whammy against detection.
Conversely, at wide apertures, diffraction is minimal. The image is sharp (assuming your lens sharpness holds up), and any dust shadows are rendered with crisp edges. This is why identifying sensor spots in high-aperture photos is so effective—you're working with the sharpest, most revealing optical conditions your camera can produce. You're giving the dust nowhere to hide.
And honestly? This is also why some photographers swear their sensor is clean when it absolutely isn't. They test at f/8 or f/11, see nothing, and call it a day. But f/8 is still too slow for a reliable dust check. Go wider. Go to f/1.4 if you can. That's where the truth lives.
Fixing the Spots: From Quick Blasts to Wet Cleaning
The Blower Ballet (Don't Use Canned Air)
So you've done the sky test. You've seen the dust. Now what? First, try a rocket blower—one of those giant rubber bulbs with a nozzle. Point your camera sensor downward (gravity is your friend), and give it a few firm squeezes. Do not, under any circumstances, use canned air. Canned air contains propellants that can freeze into liquid and spray onto your sensor, leaving residue that's worse than the dust. Plus, the pressure can damage the shutter curtain.
The blower works for loose, dry dust. About 70% of the time, that's all you need. Give it a few puffs, repeat the sky test, and see if the spots are gone. If they are, great. You're done. If not, you've got the sticky kind of grime—oil, dried moisture, or something that's been pressed onto the sensor's filter by the shutter. That requires wet cleaning.
I keep a blower in every camera bag I own. It's a cheap, non-destructive tool. Use it first. Use it often. It's the simplest step in removing sensor dust, and it works for most cases.
When You Need to Swab: The Wet Cleaning Reality Check
If the blower fails, you need to go deeper. Sensor swabs and cleaning solution are your next step. Swabs are designed to match your sensor size (full-frame vs APS-C, etc.), and the solution is a methanol-based fluid that evaporates quickly without residue. You use one drop per swab, drag it across the sensor in a single smooth motion, and discard the swab. Never reuse swabs.
I've done this hundreds of times. It's terrifying the first time. I won't lie. You're touching the most expensive part of your camera with a wet stick. But if you follow the instructions and use proper swabs, it's safe. The sensor has a protective IR filter on top. It's not as fragile as people think. That said, if you're nervous, take it to a professional repair shop. A wet cleaning typically costs $30 to $50. That's cheap insurance against a scratched sensor.
But here's the real pro tip: once you've done a wet cleaning, continue testing regularly. Identifying sensor spots in high-aperture photos should be part of your maintenance routine. Do the sky test once a month, or after any shoot in dusty conditions. It takes two minutes and saves you hours of retouching. It's the best habit I ever developed in fifteen years of photography.
---
Common Questions About Identifying Sensor Spots in High-Aperture Photos
Why do sensor spots only appear at wide apertures and not at small apertures?
Because of the angle of light. At wide apertures like f/1.4, light hits the sensor from a shallow angle, casting sharp shadows from dust particles. At small apertures like f/16, the light is more perpendicular, and the shadows become diffuse or invisible. It's basic optics, not magic.
Can I use a lens at f/1.4 to test for dust on any camera?
Yes, as long as the lens mounts and communicates correctly with the body. The key is using any lens that can open to its maximum aperture. A fast prime lens is ideal, but even a kit lens at its widest setting (usually f/3.5) will reveal larger dust spots, though smaller ones may remain hidden.
Are sensor spots always round?
Not always. Loose dust usually appears as round or slightly oval shapes. Oil spots can look more like smudges or splatters. Water spots can be irregular with a halo effect. The shape gives clues about the source, which helps you decide how to clean it (blower vs wet swab).
How often should I check my sensor for dust?
Once a month is a good baseline, or immediately after any shoot in a dusty environment (deserts, wind, construction sites). If you change lenses often, check more frequently. Pro wedding photographers I know check before every single gig. It's a standard part of kit prep.
Is it safe to clean my own sensor, or should I send it to a shop?
If you use proper tools (rocket blower, sensor swabs, and approved cleaning fluid) and follow instructions, it's safe for most people. However, if you are clumsy or anxious, pay a shop. A scratched sensor costs hundreds to replace, while a professional cleaning costs under $50. Know your limits.