
Professional Methods to Identify and Calibrate for Systematic Errors
Have you ever run the same test three times and gotten three different results? That's random error—annoying, but predictable. But have you ever run the same test thirty times and gotten results that are all consistently off by the same amount? That's a systematic error. And honestly? That's the one that'll ruin your reputation if you don't catch it.
I've spent over a decade working in metrology, quality control, and experimental design across aerospace and biomedical manufacturing. Look—I've seen entire production runs scrapped because someone calibrated for precision instead of accuracy. They saw tight clusters on the chart and thought everything was fine. But the cluster was centered on the wrong damn number. That's a systematic bias in action. It's insidious because it feels like success. You need professional methods to identify and calibrate for systematic errors before they become your new normal.
Let me walk you through the real-world playbook. No fluff, no jargon-for-jargon's-sake. Just the stuff that works.
The Hidden Danger in Your Data
Most people think error is error. They slap a standard deviation on everything and call it a day. But here's the brutal truth: systematic errors don't show up in your standard deviation. They shift the entire distribution sideways. Your repeatability might look fantastic while your accuracy is garbage. That's why identifying them requires a different toolkit—one that most operators never learn.
Why Random Error Gets All the Attention
Random error gets the glory because it's easy to talk about. It's Gaussian. It's symmetrical. It has a nice bell curve. Training courses drone on about standard deviation and variance, and engineers love plotting those histograms. Meanwhile, systematic bias sits quietly in the corner, smiling as the process drifts three sigma off target.
Seriously—I've watched teams chase random noise for weeks while a simple offset ruined their yields. They'd tweak temperatures, adjust pressures, run more replicates. But the calibration for systematic errors never happened because nobody stopped to ask: "Is our reference standard even correct?" That's the blind spot.
Here's what the textbooks won't tell you: random error averages to zero given enough trials. Systematic error does not. It's a constant companion. It doesn't get smaller with more data. It just gets more precisely wrong. This distinction is everything.
The Statistical Detectives: Beyond Standard Deviation
So how do you actually catch a systematic error? You need methods designed for bias detection, not just precision. Start with a Bland-Altman plot. It's not just for medical statistics—it's the single best visual tool for spotting systematic bias between two measurement methods or between a method and a reference.
Here's the quick checklist I use with every new process:
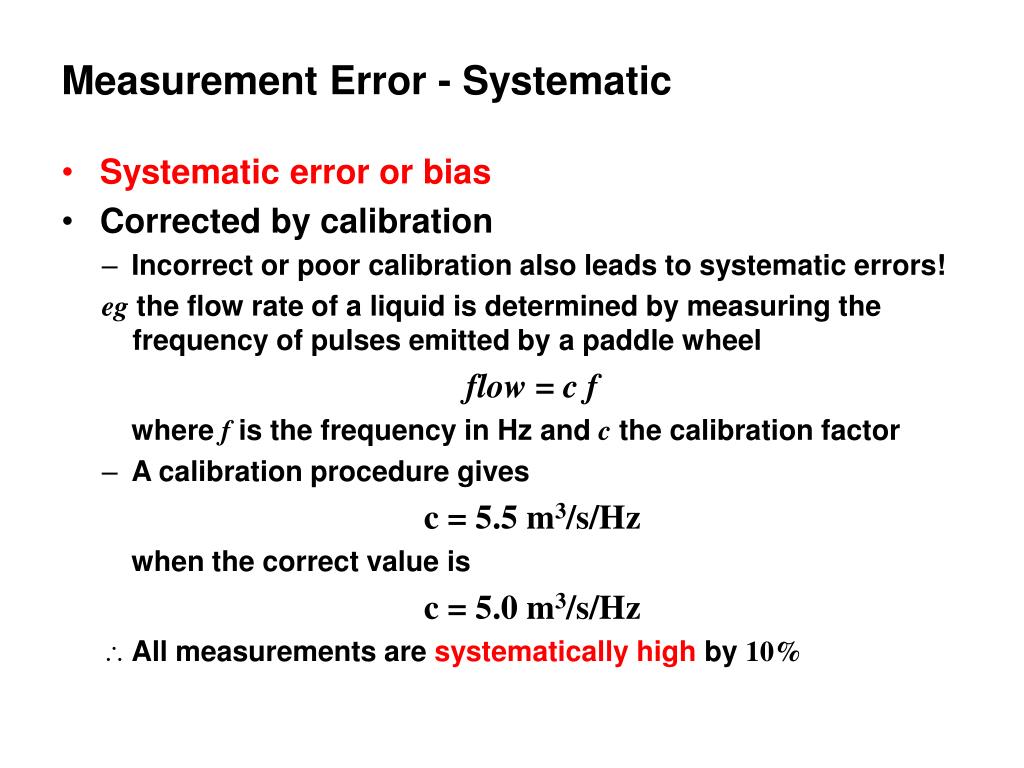
- Calculate the mean difference between your measurement and a known standard. If it's not zero, you've got bias. - Run a t-test on that difference. A p-value below 0.05 means your bias is statistically significant, not just random fluctuation. - Plot residuals against the reference values. Systematic error shows up as a non-random pattern—a curve, a drift, or a constant offset. - Use an interlaboratory comparison. Send samples to a certified lab. If their results consistently differ from yours in one direction, you've identified a calibration for systematic errors need.
I once consulted for a pharmaceutical company where the in-house HPLC results were 2.3% higher than the contract lab's results every single time. The team insisted the contract lab was wrong. Turned out their reference standard had degraded and nobody caught it. That 2.3% bias had been baked into every batch release report for six months. A simple residual analysis would have flagged it in one afternoon.
The Two-Front War on Bias
Identifying the error is only half the battle. Once you know you have a systematic error, you need to calibrate it out. But here's where most people screw up: they apply a numerical fix without understanding the physical cause. That's a Band-Aid on a bullet wound.
Root Cause Analysis for Physical Systems
You cannot calibrate what you don't understand. Period. So before you touch any correction factor, do a proper root cause analysis. The professional methods to identify and calibrate for systematic errors always start with the hardware.
Check these things first:
- Is the sensor drift thermal or temporal? Many sensors shift with temperature. Your systematic bias might disappear when you stabilize the environment. - Is there a zero offset? Tare the system with no load. If it doesn't read zero, you've found your problem. - Is the reference standard certified and within its calibration interval? An expired standard is worse than no standard—it gives you false confidence. - Does the measurement geometry change with use? Probes wear, lenses fog, gaskets compress. All of these create consistent offsets.
I remember a case involving a torque wrench calibration system. Every test showed the same 4 N·m error. The team spent a month recalibrating electronics. Finally, someone noticed the wrench holder had a burr on the mounting face. The burr caused a consistent misalignment. Grinding it flat fixed the systematic error without touching a single electronic component. That's root cause.
Applying a Correction Factor
Sometimes the physical fix isn't possible. Maybe the sensor is embedded in concrete. Maybe replacing it costs more than the project budget. In those cases, you apply a correction factor. But do it right.
The method is straightforward:
1. Measure a known standard at least 10 times. 2. Calculate the mean difference between your measurement and the true value. 3. That difference becomes your additive correction. Apply it to every future reading.
But here's the key: document the uncertainty of that correction. Your calibration for systematic errors is only as good as your reference. If your standard has a 0.5% uncertainty and your bias is 0.3%, you might not need to correct at all. The correction itself could introduce more noise than the original error.
I always tell clients: "Don't correct a bias that's smaller than your measurement noise." It's a trap. You end up chasing ghosts. Only correct when the bias is statistically significant and physically meaningful.
Calibrating the System, Not Just the Instrument
This is where the veterans separate from the rookies. You don't calibrate a gauge. You calibrate a measurement system. The gauge is just one component. The environment, the operator, the software, the data acquisition chain—they all contribute to systematic errors. You have to calibrate the whole damn chain.
The Golden Rule of Reference Standards
Your reference standard is the anchor. If it drifts, everything drifts with it. So you need a hierarchy of traceability. Every measurement should be traceable back to a national or international standard. That's not a suggestion—it's a requirement for any credible professional method to identify and calibrate for systematic errors.
Here's the hierarchy I use:
- Primary standard (e.g., NIST-traceable mass). This stays in a controlled environment. Nobody touches it except during recertification. - Transfer standard (e.g., calibrated weights). These are used daily for routine calibration checks. - Working standard (e.g., the internal reference on your balance). This gets checked against the transfer standard weekly.
If any level drifts, you catch it before it propagates to production. This is how you prevent systematic bias from becoming your baseline. It's boring. It's tedious. It works.
I've seen labs skip this hierarchy to save money. They'd use one cheap weight for everything. Then the weight oxidation 0.02 grams, and suddenly every pharmaceutical batch was under-dosed. That's not a calibration failure. That's a system failure.
Incorporating Control Samples
You can't just calibrate once and forget it. Systematic errors drift over time. Temperature cycles age components. Operators develop habits that introduce new biases. You need ongoing monitoring.
Control samples are your early warning system. Run a known standard at the start of every shift, after every maintenance event, and whenever you suspect a problem. Plot those results on a control chart. Look for shifts, trends, and outliers.
Here's what I look for:
- A sudden shift of more than two standard deviations from the mean. Likely cause: equipment change or operator change. - A gradual trend over multiple runs. Likely cause: sensor drift or environmental change. - Increased variability without a shift. Likely cause: degraded components or improper technique.
When you see any of these, stop and investigate. Don't wait for the next calibration cycle. The professional methods to identify and calibrate for systematic errors require immediate action. I've shut down production lines for a six-sigma trend that looked minor on paper. The operators thought I was overreacting. Three hours later, we found a cracked connector that would have failed catastrophically.
Common Questions About Professional Methods to Identify and Calibrate for Systematic Errors
What is the difference between systematic and random error?
Systematic error shifts all measurements consistently in one direction. It's caused by bias in the instrument, environment, or method. Random error causes scatter around the true value. It's caused by unpredictable fluctuations. The key distinction: systematic error does not average out with more measurements. Random error does.
How do I know if I have a systematic error?
You compare your measurements to a known standard. If the mean difference is significantly different from zero, you have bias. Use a t-test to confirm statistical significance. You can also use a Bland-Altman plot to visually inspect the agreement between your method and a reference method.
Can calibration fix all systematic errors?
No. Calibration corrects for offset and scale errors, but it cannot fix errors caused by poor experimental design, operator bias, or fundamentally flawed measurement methods. If your sensor measures the wrong parameter entirely, calibration won't help. You need to fix the root cause first.
How often should I calibrate?
It depends on the stability of your equipment and the criticality of your measurements. A general rule: calibrate at the start of every major project, after any maintenance or relocation, and at regular intervals based on historical drift rates. For high-stakes measurements, run control samples daily and recalibrate monthly.
What is a correction factor, and how do I calculate it?
A correction factor is a numerical adjustment applied to raw measurements to remove systematic bias. Calculate it by taking the mean difference between your instrument and a certified reference. Apply that difference as an additive correction to all future readings. Always document the uncertainty of the correction and recheck it periodically.