
Customizing Arrowheads and Line Styles in Visio Like a Pro (Finally)
Have you ever stared at a Visio diagram that looked like it was drawn by a toddler with a ruler? You know the one—lines overlapping, arrows pointing in the wrong direction, and that ugly default blue that makes everything look like a hospital map. I’ve been there. Seriously, I’ve wasted entire afternoons fixing connector chaos. But here's the thing: customizing arrowheads and line styles in Visio isn't just about making your diagram “pretty.” It's about clarity, hierarchy, and making sure your audience actually understands the flow without a decoder ring. Let’s fix that.
I’m going to walk you through the exact techniques I use to transform Visio connectors from boring stock shapes into polished, professional diagram elements. We’re talking line weights that actually mean something, arrowheads that don’t look like triangles from a 1990s clip art set, and a few tricks that most people miss entirely. Ready? Let’s dive in.
Understanding the Visio Connector: More Than Just a Line
Most people treat the connector tool like a freeway—just get from point A to point B. That’s a mistake. A connector in Visio is a living, breathing object with its own properties, behaviors, and yes—personality. The moment you start customizing arrowheads and line styles, you’re not just changing colors; you’re encoding meaning. Heavy lines? That’s a primary flow. Dashed lines? That’s secondary or optional. It’s a visual language, and you need to speak it fluently.
Why Default Line Styles Kill Your Diagram’s Impact
Look—default line styles are designed to work for everyone, which means they work for no one. The standard 0.75pt line with a simple arrowhead says absolutely nothing about your data. It’s the visual equivalent of “meh.” When I audit client diagrams, the first thing I look for is whether they’ve touched the line weight or arrowhead at all. If it’s all default blue with tiny arrows, I know they just clicked and dragged without thinking.
Here’s where customizing arrowheads and line styles changes the game. A thick, solid black line with a large, filled arrowhead screams “primary path.” A thin, gray, dashed line with no arrowhead whispers “information only.” Your readers start reading the diagram without reading a single label. That’s power. That’s professionalism. And it takes about thirty seconds to implement once you know where the controls live.
The Rhythm of Line Weight and Dash Patterns
Ever notice how professional diagrams have a rhythm? There’s a visual pulse created by alternating line weights and dash patterns. I use this constantly. For example, in a process flow diagram, I’ll use a 2pt solid line for the main sequence, a 1.5pt dashed line for exceptions, and a 0.5pt dotted line for annotations. The key is consistency. If you randomly mix styles without a system, you get noise.
Customizing arrowheads and line styles in Visio gives you that rhythm. You can assign specific arrowheads to specific relationship types. “Is-a” relationships get an open arrowhead. “Has-a” relationships get a diamond. “Dependency” gets a simple line arrow. It’s a vocabulary. Once you define it, you stick to it. Your brain will start associating the visual pattern with the meaning automatically.
Moving Beyond the Basics: Line Style Tricks That Actually Matter
Let’s get tactical. I’m going to share the exact settings I use for every diagram I build. These aren’t random—they’ve been battle-tested in hundreds of client projects. The goal here is to make your customizing arrowheads and line styles workflow fast, repeatable, and bulletproof.
The “Three-Level” Line Weight Rule
I follow a strict three-level hierarchy for line weights. Level one is for primary flow: 2pt to 3pt. Level two is for secondary or conditional flow: 1pt to 1.5pt. Level three is for annotation or background flow: 0.5pt to 0.75pt. That’s it. You don’t need a dozen weights—you need three clear categories. And yes, this applies even when you’re customizing arrowheads and line styles. The arrowhead should visually match the line weight. A fat line with a tiny arrowhead looks ridiculous. Balance matters.
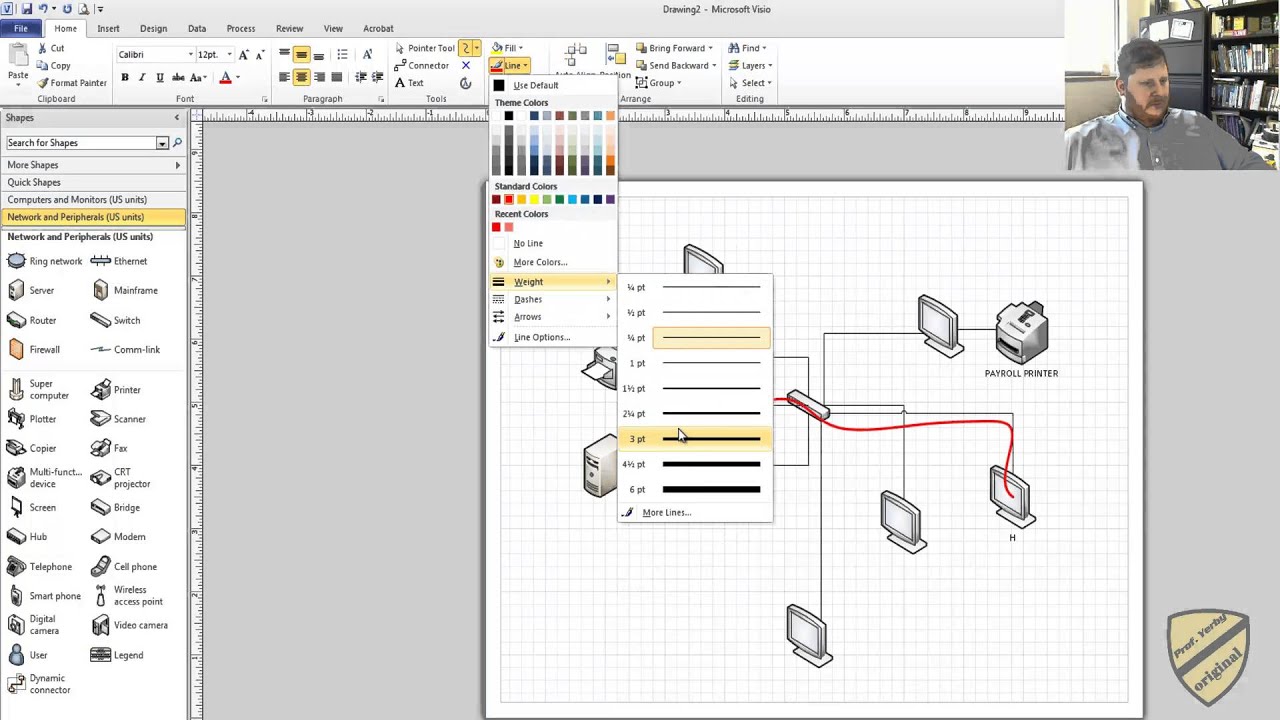
To adjust line weight, select the connector, go to the Home tab, and look for the Shape Styles group. The Line Weight drop-down gives you presets, but I almost always use the “More Lines…” option to get exact values. Pro tip: create a style template with your three weights saved as Quick Styles. Saves me hours every month.
Dash Patterns: The Color Wall You Didn’t Know You Had
Dashes aren’t just dashes. Visio gives you a surprising amount of control here, and most people skip right past it. Under the Line options, you’ll find “Dash type” which offers presets, but the real magic is in “Line Pattern.” This is where you define custom dash-gap sequences. I use a pattern of 4pt dash, 2pt gap for primary secondary flows. For annotations, I use 2pt dot, 4pt gap.
Customizing arrowheads and line styles means matching your dash pattern to the arrowhead style. A heavy dash pattern with a light arrowhead looks off. Think of it as a visual handshake—they should complement each other. And for the love of good diagrams, avoid the “Round Dot” dash pattern unless you’re trying to make your diagram look like a connect-the-dots puzzle. Seriously, it’s rarely a good choice.
Custom Arrowheads: Where the Magic Happens
Arrowheads in Visio are surprisingly flexible once you dig into the settings. The default options—triangle, open triangle, diamond, and circle—are fine for quick sketches. But professional diagrams demand more nuance. Let me show you the three custom arrowhead tricks I swear by.
Building Your Own Arrowhead Style from Scratch
You can’t technically “draw” a custom arrowhead shape in the standard UI, but you can get incredibly close by combining existing options with line end properties. Here’s the method: Use the “Open Arrowhead” style but adjust the size. Everyone overlooks the arrowhead size slider. Under “More Arrows,” there’s a scale factor. Crank it up to 200% for a bold, aggressive arrowhead. Drop it to 75% for a subtle, refined look.
- Triangle (Filled): Best for direct, primary flows. Size 150% works well with 2pt lines.
- Diamond (Filled): Perfect for “classification” or “type of” relationships. Size 125%.
- Circle (Hollow): Useful for “connection point” indicators. Size 100%.
- Open Arrowhead: Great for modern, minimalist diagrams. Size 200% to avoid looking wimpy.
The Scaling Trap and How to Avoid It
One of the biggest mistakes I see is people scaling arrowheads without scaling the line weight. You cannot have a 3pt line with a 50% arrowhead. It looks like a snake with a pinhead. Conversely, a 0.5pt line with a 300% arrowhead looks cartoonish. When customizing arrowheads and line styles in Visio, always test the combination at actual print or screen size. Zoom out to 50% and see if the arrowhead still communicates. That’s the real test.
Remember that arrowheads also have color properties independent of the line. By default, they inherit the line color, but you can override this in the “Format Shape” pane. I sometimes use a slightly lighter shade for the arrowhead fill to create depth. It’s a tiny detail, but it makes the diagram look three-dimensional and polished. Try it on your next flowchart—you’ll see the difference immediately.
The Secret Weapon: Storing and Reusing Custom Styles
Here’s the part that separates the pros from the hobbyists. You can spend fifteen minutes perfecting a customizing arrowheads and line styles combination for one connector, but if you don’t save it, you’ll have to rebuild it every time. That’s insanity. Visio has a Quick Styles feature, but it’s clunky. Instead, I use the “Format Painter” as a diagnostic tool, and I build a master template stencil.
Creating a Connector Style Master Template
Open a blank Visio drawing. Create three connectors with your three line weight categories. Apply your exact arrowhead, dash pattern, and color settings to each. Now save this as a template (.vstx file). When you start a new diagram, open from that template. Your connectors are pre-styled. You just drag and drop. This single workflow change will save you more time than almost anything else when customizing arrowheads and line styles in Visio.
You can take this further by using the “Drawing Explorer” window (Developer Mode required). Under “Line Patterns,” you can define custom pattern files. This is for power users only, but it allows you to create entirely new dash patterns and arrowhead behaviors. I’ve used this to create dashed lines with alternating arrowheads for complex state machine diagrams. It’s overkill for most projects, but when you need it, there’s no replacement.
Honestly? Most people never touch the Drawing Explorer. Don’t be most people. Spend thirty minutes learning it, and you’ll unlock a whole new level of control over your customizing arrowheads and line styles workflow. The Developer tab is hidden by default—right-click the ribbon, go to “Customize the Ribbon,” and enable it. That’s the first step.
Common Questions About Customizing Arrowheads and Line Styles in Visio
Can I import custom arrowhead shapes from other software?
Not directly. Visio doesn’t allow importing external arrowhead SVGs or custom shapes into the line-end options. However, you can create a custom shape that looks like an arrowhead and place it at the end of a line manually. It’s a workaround, not a feature. For 99% of use cases, the built-in options combined with size scaling are sufficient.
Why do my custom line styles disappear when I copy connectors between documents?
This happens when the target document doesn’t have the same style definitions. Always paste your connectors into a document that shares the same template or theme. If you’re working across files, use the “Format Painter” to reapply styles rather than relying on default inheritance. The style disappears because the target document doesn’t “know” your custom customizing arrowheads and line styles settings exist.
Is there a way to batch-update arrowheads across an entire diagram?
Yes, but it’s not obvious. Use the “Select All by Type” feature (Home tab, Editing group, Select, Select All by Type, choose “Connectors”). Once all connectors are selected, apply your line style changes. This works for line weight, dash pattern, and arrowhead type simultaneously. It’s the fastest way to standardize a messy diagram. Just be careful—if you have different connector categories, you’ll need to select them separately.
What’s the best arrowhead for a data flow diagram?
For data flow diagrams (DFDs), use the open arrowhead at 150% size with a 1pt line. The open arrowhead visually distinguishes data movement from process flow. Filled arrowheads look too heavy for data flows. This is a stylistic standard in the industry. When customizing arrowheads and line styles for DFDs, keep it minimalist—the content should speak, not the decoration.
Mastering customizing arrowheads and line styles in Visio is one of those skills that looks minor on paper but transforms the quality of your output dramatically. It’s the difference between a diagram that gets glanced at and one that gets studied. Take the thirty minutes to build your style template, define your hierarchy, and test your combinations. Your future self—and your audience—will thank you.