
How to Pressure Test PEX Plumbing Lines
I learned this the hard way. Picture a brand-new master bathroom renovation. Tile is laid, vanity is installed, and I'm feeling pretty smug about my work. Then I fill the PEX lines for the first time, and there is a faint, almost musical hissing sound coming from behind the shower valve. That hiss cost me a Saturday and a sheet of drywall. If I had taken thirty minutes to properly pressure test PEX plumbing lines before buttoning everything up, I would have caught it. Seriously, this is the single most important step that separates a professional installation from a disaster waiting to happen.
Look—PEX is tough. It can freeze without bursting in many cases. It bends around corners like a gymnast. But those beautiful, flexible lines are only as good as their connections. A crimp ring that's slightly off-center? A stab-in fitting that didn't fully seat? These are silent killers. You won't see them during a visual inspection. You need to prove the system holds. You need to put it under pressure. Pressure testing PEX lines isn't just a suggestion; it's the only way to sleep soundly after you seal the walls.
And honestly? It's not hard. It just requires a specific tool, a little patience, and the stubborn refusal to rush. Let's dive into the exact method I've used on hundreds of jobs, from single vanity runs to whole-house rehabs. I promise, this is cheaper than a flood claim.
Why Bother? The Raw Truth About PEX and Pressure
PEX is a plastic polymer. It expands and contracts with temperature changes. This is a feature, not a bug. But this same flexibility can hide a leak that only shows up under sustained load. A drip at a cold joint might be invisible at 40 PSI but becomes a geyser at your full city water pressure of 75 PSI. That's why simply turning on the water and checking for drips is a fool's errand. You need a controlled, elevated test that mimics the worst-case operating scenario.
Industry standards and most local codes require a hydrostatic test on all newly installed PEX plumbing lines. This means filling the system with water (not air—more on that later) and applying a specific pressure for a specific duration. It's a big deal. You are proving the integrity of every single connection, every fitting, and every foot of tubing before it disappears behind a wall.
I've seen guys skip this step because they were "running behind." Every single one of them regretted it. The extra hour you spend testing now saves you from cutting into a finished ceiling later. It's the ultimate insurance policy.
Here is the cold, hard truth: a failed pressure test is a gift. It means you found the problem before it became a mold problem, a structural problem, or a drywall problem. Celebrate the failure. Fix it. Test again. Then move forward with confidence.
The Silent Killer of New Installations
What's the most common failure point? It's almost never the pipe itself. It's the connection. Whether you are using expansion rings, crimp rings, or push-fit fittings, the interface between the PEX and the brass or plastic fitting is the leak point. A pressure test stresses that interface. A poor crimp might hold for a minute at low pressure, but under the sustained 60-80 PSI of a standard test, it will weep. You can't feel a weep. You can only see it on a gauge or a drop of water.
Another culprit? Shoddy pipe prep. I'm talking about burrs on the cut end of the PEX. When you cut the tubing, use a proper PEX cutter. A jagged edge can shave the rubber O-ring inside a push-fit fitting. That O-ring is the seal. If it's compromised, the fitting will leak. A visual check won't reveal this. Only a full PEX line test will catch it. It's a detail that separates the craftsmen from the hacks.
Lastly, don't forget the potential for a misaligned expansion ring. With the Uponor (expansion) method, the ring must be exactly flush with the end of the pipe. A slight gap means the ring isn't applying full compressive force. That gap is a guaranteed leak. You can't see it after the pipe is buried in insulation. You test it.
What the Manufacturer Actually Expects
Let's get specific. The major PEX manufacturers—Uponor (Wirsbo), Viega, Zurn, Sioux Chief—all publish specific testing procedures. They aren't suggestions. They are the engineering guidelines for how the product is designed to behave. Generally, they call for testing at 1.5 times the working pressure, but not less than 50 PSI above the maximum operating pressure. For most residential systems, that means pumping the system up to around 80 to 100 PSI.
You hold that pressure test for a minimum of 1 hour. Some inspectors want 2 hours. The gauge should not drop. A drop of 2-3 PSI might be due to temperature changes (water cooling down in the pipes). A drop of 5 PSI or more? You have a leak. The manufacturer expects the system to be absolutely rigid in its performance. No weepers. No creep. Zero tolerance for pressure loss.
And here's a nuance that trips up beginners: the test is done with WATER. Not air. I cannot stress this enough. Water is incompressible. If a connection fails, you get a small spray or drip. Air is compressible. A compressed air test holds a massive amount of potential energy. A PEX fitting blowing off under 80 PSI of air can send a chunk of plastic flying at lethal velocity. It's like a grenade. Never, ever use compressed air to test PEX lines. Stick to a hydrostatic (water) test.
Step-by-Step: How to Pressure Test PEX Plumbing Lines Like a Pro
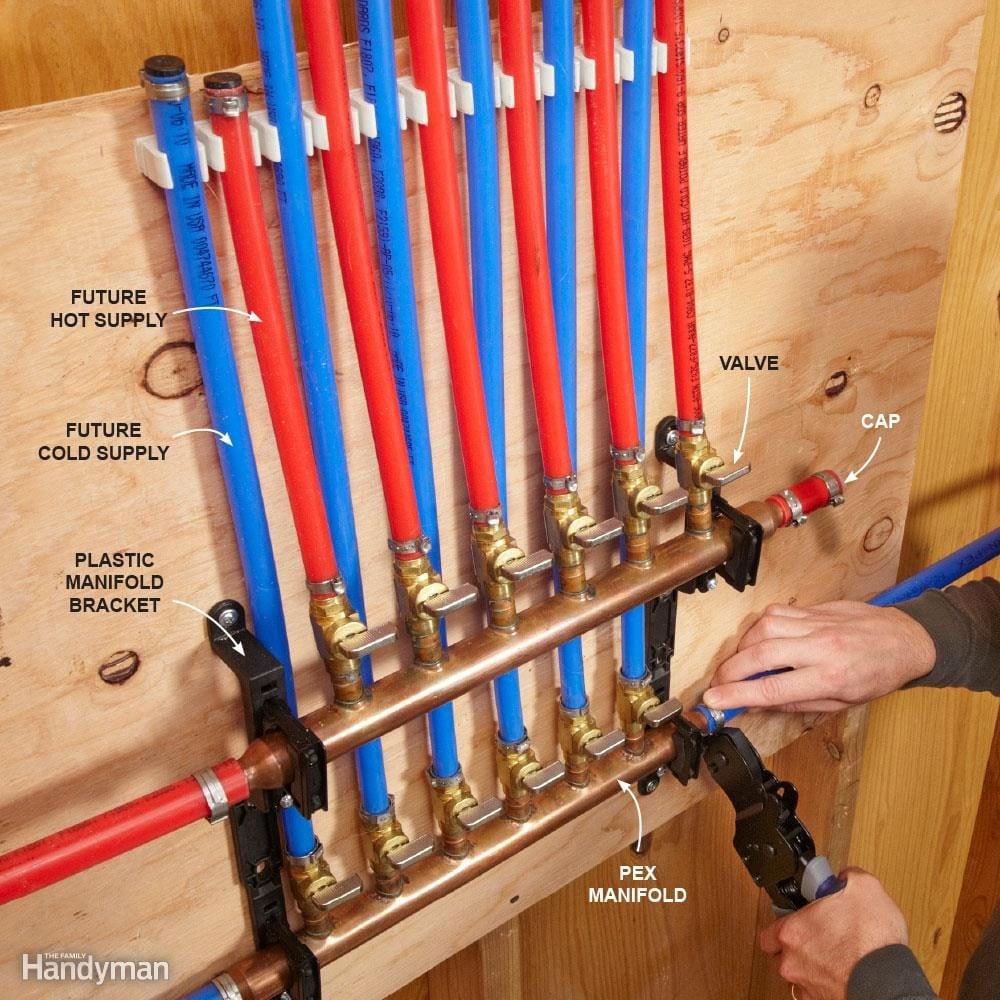
Alright, you've got your PEX run. All the lines are stubbed out to the fixtures. The manifolds are mounted. The crimps are done. Now you protect your work. This process is straightforward, but you need the right gear. Don't try to hack this with a garden hose and a prayer.
- Essential Gear: A 2-gallon or larger hydrostatic test pump (rent one from Home Depot or buy one).
- Essential Gear: A high-quality pressure gauge that reads in 1-PSI increments.
- Essential Gear: A female garden hose adapter to connect to a hose bib or test port.
- Essential Gear: A bucket of water (or a hose connection to the pump).
- Essential Gear: PEX caps or plugs for all open stub-outs.
First, you cap every single open end. Every hot water stub-out for the sinks. Every cold line for the toilet. Every shower valve outlet. If you have a manifold system, close the valves on the manifold, then open one port at a time to pressurize the whole zone. You need a closed loop. No air pockets. Fill the system slowly from the test pump.
Setting Up Your Test Rig
Connect your test pump to a dedicated test port. This is usually a hose bib or a 1/2-inch ball valve you've installed on the manifold or a main trunk line. Pump water into the system until the gauge reads about 60 PSI. Stop. Then bleed the air. You have to get the air out. All of it. Air is compressible and will mess with your gauge readings. Open the highest fixture in the house (like a shower valve) or use the air bleeder valve on your pump. Pump more water in. Keep bleeding until you get a pure stream of water with no sputtering. This step is tedious. Do it anyway.
Once the system is full of water and purged of air, pump the pressure up to your target. For a standard residential system, I typically go to 100 PSI. Your target might be 80 PSI if you have older fixtures or a pressure-reducing valve that is sensitive. Check your specs. Give the pump handle a few extra strokes to get there. Then close the valve on the pump itself. Now, the real watching begins.
Don't just stare at the gauge. Walk away for 15 minutes. Come back and look. If the needle has moved, you don't necessarily panic. A drop from 100 to 98 PSI could be temperature-related as the water cools from the friction of pumping. A drop to 90 PSI? You have a leak. Mark the starting pressure and the time. Let it sit for the full hour.
The Pressure Cycle
After the initial hour, re-pump the system back to your target pressure. This second push is crucial. Sometimes a small leak will seal itself temporarily with a piece of debris or scale, but the sustained pressure will push it out. If the pressure holds steady for the second hour, you are golden. If it drops again, you have a leak that is dynamic—it only opens under specific pressure. I had a shower valve cartridge leak once that only showed up at 85 PSI. I found it by doing this cycle.
What about checking for leaks visually? Yes, absolutely. While the system is under pressure, walk the entire route. Feel every crimp ring. Look for the tiniest bead of water. Use a dry paper towel and touch it to every fitting. If the towel comes back damp, that joint is leaking. Mark it with a piece of tape. Depressurize the system. Fix the connection. Re-crimp or replace the fitting. Then repeat the test. Do not skip the re-test. You need to verify your fix actually worked.
One pro tip: take a photo of the gauge at the start and end of the test. If you have a building inspector, they will want to see that evidence. It also protects you if a leak appears months later—you have proof you showed the system was tight. It builds trust.
The Mistakes That Will Ruin Your Test (and Your Floor)
I've made most of these mistakes personally. Let me save you the trouble. The biggest blunder is rushing the air-bleeding step. If you leave a large air bubble in the system, your gauge will read a false high pressure. Then, as the air compresses and decompresses with temperature, the needle will dance wildly. You will think you have a leak when you don't. Or worse, you will think the pressure is stable when it isn't. Air is a liar. Water is the truth.
Another classic error is testing with the expansion tank still connected. On a closed system with a water heater, the expansion tank absorbs pressure. You will never get the system up to test pressure because the expansion tank will just compress. You have to isolate the water heater by closing the cold water inlet valve or disconnect the expansion tank temporarily. Otherwise, you are fighting physics.
The Number One Mistake: Using Air
I already touched on this, but it's worth repeating. I had a buddy who thought he would save time by using a compressor to pressure test his PEX lines. He had a push-fit fitting blow off a 1/2-inch stub-out. The fitting shot across his garage like a pellet and hit the drywall, leaving a dime-sized dent. He was standing right where it went. Had it hit him in the eye? He could have lost his sight. Water doesn't do that. Water just drips. Use water. It's the only safe way to perform a PEX plumbing pressure test.
Also, don't test at stupid high pressures. I see DIY articles that say to pump up to 150 PSI. That is dangerous. You can damage the pipe wall or the internal seals of a manifold. Stick to the manufacturer's recommendation, which is usually 1.5 times the working pressure, max 100-120 PSI. You are testing for leaks, not trying to burst the pipe. Respect the material.
Ignoring Temperature and Ambient Conditions
PEX expands with heat. If you test the system when the pipes are cold (say, 40 degrees F) and then the sun warms up the plumbing bay, the water inside will expand and increase the pressure. Suddenly, a stable test shows a pressure spike. This doesn't mean you have a leak. It means physics is happening. Conversely, if the pipes cool down, the pressure will drop. A 10-degree temperature change can cause a 2-3 PSI shift. Understand your environment. Test in a stable temperature, or at least account for the change. Don't start chasing a phantom leak caused by a cold draft.
Last thing: don't walk away from the test for two hours and forget about it. Keep an eye on the gauge. I've had situations where a small leak would slowly drip and then stop because the water found a new path. You catch it by being present and doing a thorough visual inspection. The gauge can tell you there is a problem, but only your eyes and hands can tell you where it is.
Common Questions About How to Pressure Test PEX Plumbing Lines
How long should I hold the pressure test on PEX?
The industry standard is a minimum of 1 hour, but many inspectors prefer 2 hours. I personally do a 2-hour test on all my own projects. It gives me peace of mind. Longer is always better, as it accounts for temperature changes and the slow weeping of a bad crimp.
What PSI should I use for a PEX pressure test?
For most residential systems, target 80 to 100 PSI. Check your local code and the PEX manufacturer's guidelines. You want to test at 1.5 times the expected working pressure, but never go above 120 PSI for standard PEX tubing.
Can I use air instead of water to pressure test PEX?
No. Absolutely not. Using compressed air is dangerous because the energy stored in compressed air can cause a fitting to explode like a projectile. Always use water for a hydrostatic test. Water is safe and incompressible.
What does it mean if the pressure drops slowly?
A slow pressure drop of 1-3 PSI over 1 hour is often due to the water cooling down from the initial pumping. If the drop is more than 5 PSI, you have a leak. Walk the system and look for a tiny water bead at every fitting. Use a dry paper towel to detect moisture.
Do I need to test every zone individually?
It's smart to test zones if you have a manifold system. Test the hot water zone, then the cold water zone, or test each branch line if possible. This isolates any leaks to a specific area, making it much easier to find and fix the problem. You can also test the entire system at once if you cap all stub-outs.
Pressure testing PEX isn't glamorous. It's plumbing's version of a fire drill. But it's the difference between a house that works for decades and a costly, emotional repair. Cap it. Fill it. Pump it. Watch it. Fix it. Then move on with your life knowing your work is bulletproof.