
How to Wire a Three Phase Motor in Delta
So you've got a three-phase motor in front of you, a terminal box with six unlabeled studs, and a vague memory that “delta” is the one that looks like a triangle. Been there. Honestly? Most electricians get this wrong at least once—not the wiring itself, but the consequences. Wire it in star when you need delta, and your motor becomes a pathetic, underpowered whisper. Wire it correctly, and you get full torque, full speed, and a machine that actually does its job. Let's fix that.
Look—how to wire a three phase motor in delta isn't some arcane mystery. It's a configuration where each phase winding connects directly across two supply lines. No neutral. No center point. Just three windings forming a closed loop. This matters because it determines voltage across each coil. In a delta setup, each winding sees the full line-to-line voltage. For a 230V/400V motor, that means the low-voltage winding gets 230V—which is precisely what it wants. Get this right, and you're golden.
Why Delta Matters (and Why You Should Care)
You might be thinking, “Can't I just hook it up and see what happens?” Please don't. A three phase motor wired incorrectly doesn't just run poorly—it can overheat, vibrate like a washing machine with a brick in it, or simply refuse to start. The delta configuration is the go-to for motors that need to deliver full power from the get-go. It's common in conveyors, pumps, compressors, and anything that hates gentle starts.
Seriously, understanding the delta wiring is non-negotiable if you're dealing with a dual-voltage motor. Most industrial motors come with a nameplate showing two voltages, like 230V/400V. That's your clue. For the lower voltage, you wire it in delta. For the higher voltage, you switch to star. Miss that distinction, and you're applying 400V across a winding designed for 230V. That winding will fry. Fast.
This isn't theoretical. I've seen a brand-new 15kW motor literally smoke within ten seconds because someone skimped on the manual. The smell is unforgettable. So let's avoid that, yeah? The delta configuration connects windings end-to-end, forming a triangle. Each junction (corner of the triangle) gets connected to one of the three supply phases (L1, L2, L3). That's it. Simple geometry saves you from a fire.
Here's a quick reality check: delta offers higher starting torque than star. That's why it's the star–delta starter's secret weapon. The starter uses star for a gentle launch, then switches to delta for full power. But if you hard-wire delta and your supply can't handle the inrush current, you'll trip breakers. Know your load. Know your supply. This is practical stuff, not textbook fluff.
The Step-by-Step: How to Wire a Three Phase Motor in Delta
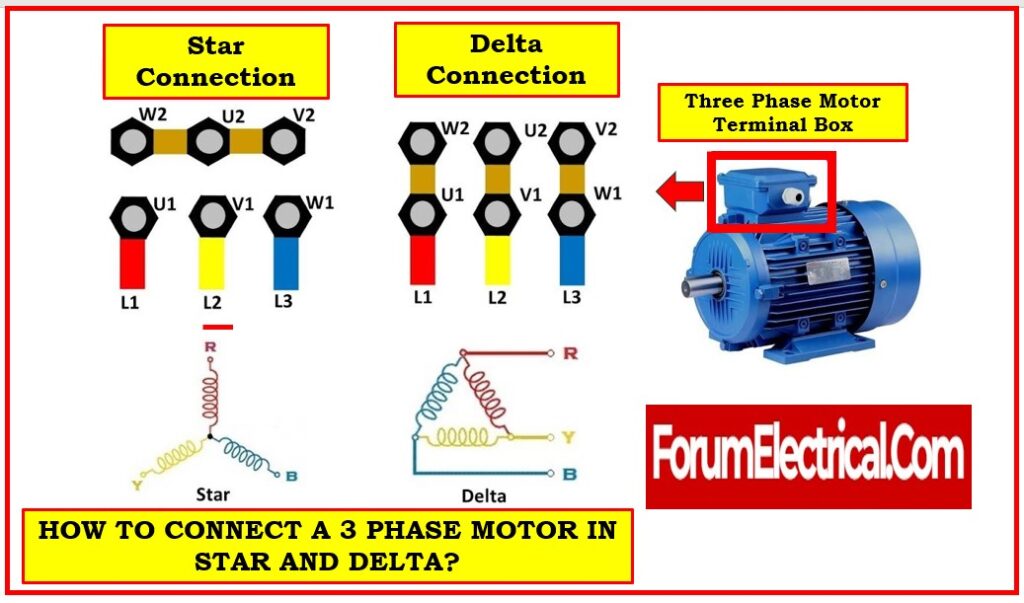
Alright, sleeves rolled up. Before you touch a single screwdriver, pull the motor's terminal box cover. Inside, you'll see six terminals—usually labeled U1, U2, V1, V2, W1, W2. Or sometimes T1 through T6. The exact labels vary by manufacturer, but the pattern is universal. U, V, W are the three phases. The '1' and '2' indicate the start and end of each winding. In wiring a three phase motor in delta, you connect the end of one winding to the start of the next. Like a chain, but electrical.
Step 1: Identify Your Windings
Grab a multimeter. Set it to continuity (ohms). Measure between terminals to find pairs that show a low resistance—those are the two ends of a single winding. Mark them. For example, U1 and U2 are one winding. V1 and V2 are another. W1 and W2 are the third. Don't trust the colors on the wires—trust your meter. I've seen factory labeling that was flat-out wrong. Seriously. Check everything.
Once you've identified the three windings, note which end is which. It doesn't truly matter for delta, but for star-delta starters, polarity matters. For a simple delta connection, you just need the pairs. Write them down. Tape labels if you have to. This is the boring part that prevents the spectacular part where things explode.
Now, look at the nameplate. Confirm the voltage rating. If it says “Delta 230V” or “Low Voltage 230V,” proceed. If it says “400V,” stop—you need star. The nameplate is your contract. Break it at your own risk (and your wallet's expense).
Step 2: Make the Bridge Connections
This is where the triangle takes shape. You'll connect U2 to V1, V2 to W1, and W2 to U1. Use short copper links or jumpers—these often come with the motor. If not, use appropriately rated wire. Tighten each connection firmly. Loose terminals create arcing, heat, and eventually, a dead motor. I'm not kidding—torque those screws. Not “hand-tight,” not “snug.” Use a screwdriver with a decent handle and give it a proper twist.
- Bridge 1: U2 to V1 (connects winding A end to winding B start)
- Bridge 2: V2 to W1 (connects winding B end to winding C start)
- Bridge 3: W2 to U1 (connects winding C end to winding A start)
Look at your setup now. The three bridges form the sides of a triangle. The three corners are the points where you'll connect the supply. Those corners are: the junction of U1/W2 (call it L1), V1/U2 (call it L2), and W1/V2 (call it L3). Or whatever labeling system you prefer. Just make sure each phase gets one corner.
Step 3: Connect the Supply Lines
Now bring in your three-phase supply. Connect L1 (or phase A) to the U1/W2 junction. Connect L2 (phase B) to the V1/U2 junction. Connect L3 (phase C) to the W1/V2 junction. Double-check that no supply wire touches any other bridge accidentally. A short here isn't just a trip—it's a bang. Use a wiring diagram if you're unsure. Most motor terminal box covers have a diagram printed inside. That diagram is your friend. Read it.
After connecting, gently tug each wire. If anything moves, tighten it. Secure any loose cable inside the box so nothing shifts when the motor vibrates. Close the cover, but don't fully seal it yet. You'll want to test first.
One more thing: grounding. Don't forget the grounding terminal (usually marked PE or with the ground symbol). Run a proper ground wire back to the panel. This isn't optional; it's a code requirement. Your motor frame must be bonded. Period.
Common Mistakes in Delta Wiring (And How to Avoid Them)
Even experienced guys mess this up. The most common error? Leaving one bridge connection loose. That creates an open delta—basically a single-phase condition. The motor will hum, might not start, or will draw massively unbalanced currents. Another classic: confusing start and end tags. If you connect U1 to V1 and U2 to V2, you've created a parallel connection, not a delta. That will give you half the voltage but double the current—and likely a tripped breaker.
I've also seen people use the wrong gauge of jumper wire. The jumpers carry full winding current. If they're undersized, they heat up and melt insulation. Use wire rated for at least the motor's full-load amps. Check the nameplate. It's there for a reason.
Here's a quick checklist to run through before you power up:
- Visual inspection: No loose wires, no stray strands touching adjacent terminals.
- Continuity check: Measure between each supply phase terminal and ground—should show OL (open line).
- Resistance check: Measure between L1 and L2, L2 and L3, L1 and L3. They should all be roughly equal (within a few percent).
- Rotation check: For now, just confirm the motor isn't physically locked. Phase rotation can be reversed later by swapping any two supply lines.
Take these steps seriously. A few minutes of checking can save hours of troubleshooting later. Trust me—I've chased ghosts in motors that were just wired wrong from the start.
Testing After Wiring
With everything connected, apply power briefly. Like, one second. Listen. A healthy delta-connected motor should hum smoothly and spin up to speed without excessive noise. If it hums loudly and doesn't spin, kill power immediately. You might have a single-phase condition or a locked rotor. If it spins backward, swap any two supply phase wires (not the internal bridges). That's all it takes to reverse rotation.
Measure line currents with a clamp meter. They should be balanced within 10% of each other. If one phase is significantly higher, check for a partial short or a mis-wired bridge. Also measure voltage phase-to-phase at the motor terminals—it should match the incoming supply within a few volts. If it doesn't, you have a voltage drop issue, not a wiring problem. But that's a different article.
Let the motor run under no load for a few minutes. Then shut it off and feel the terminal box. Warm is fine. Hot is not. If the box is too hot to touch, you've got a connection issue or the motor is drawing too much current. Investigate before running it again.
Common Questions About How to Wire a Three Phase Motor in Delta
What tools do I need to wire a motor in delta?
You'll need a screwdriver set (flat and Phillips), a multimeter for continuity and resistance checks, a clamp meter for current measurement, wire strippers, and possibly a torque wrench if the terminal bolts are large. Also, have copper jumpers on hand—some motors come with them, some don't. Never use aluminum jumpers for copper terminals; galvanic corrosion will ruin your day.
Can I use a star-delta starter and wire the motor permanently in delta?
Not directly. A star-delta starter physically switches the motor from star (start) to delta (run). The motor itself must be wired for delta at the full-voltage rating. The starter handles the transition. If you hard-wire the motor in delta and feed it through a star-delta starter, the starter will work correctly—but only if the motor's nameplate voltage matches the supply voltage when in delta. Confused? Stick to the nameplate.
What happens if I wire a delta motor in star?
The motor will run at roughly one-third of its rated power and torque. It will start slowly, if at all. Under load, it will overheat and likely fail. Why? Because in star, each winding only gets about 58% of the line voltage (for a 230V delta motor in star, that's about 133V per winding). The motor can't produce enough torque to do useful work. It'll just sit there, hum, and eventually cook.
How do I know if my motor is already wired in delta?
Open the terminal box. Look at the bridges. If you see three bridges connecting U2-V1, V2-W1, and W2-U1, it's in delta. If you see all the U1, V1, W1 linked together (star point) and U2, V2, W2 linked together, it's in double star (or just star, depending on the configuration). The nameplate should also tell you. If it says “Connection: Delta,” you're sorted.
Do I need to test insulation resistance before powering up?
Absolutely. Use a megohmmeter (megger) at 500V or 1000V, depending on the motor voltage. Measure between each winding and ground, and between windings. Anything above 1 megohm is acceptable. Below that, you've got moisture or winding damage. Dry it out or repair it before applying power. Ignoring this step is how motors fail mid-shift, and you get the call at 2 AM. Don't be that person.