
Understanding Fabrics and Folds in Roman Garment Art
You’ve seen those Roman statues—the ones where the marble looks like it’s about to ripple in a breeze, right? I remember standing in front of a first-century togatus in the Capitoline Museums, and my first thought was, “There’s no way real cloth did that.” But here’s the kicker: it actually could. After a decade of studying ancient textiles and the art that depicts them, I can tell you that the way Romans carved folds wasn’t just artistic flair—it was a hyper-observant understanding of how wool, linen, and even silk behaved under gravity and movement. Seriously, those sculptors knew their drapery. And if you’re an artist, a historian, or just someone who loves looking at togas and wondering “how?,” this deep dive into fabrics and folds in Roman garment art will change the way you see every draped figure.
Let me be clear: this isn’t about memorizing a list of “fold types.” It’s about getting inside the mind of a Roman artisan who watched real people walk, sit, and argue in heavy wool cloaks. The physics haven’t changed. The tricks they used to capture that physics in stone, paint, or mosaic are still relevant today. So grab your stylus—or your keyboard—and let’s unpack this.
Why Roman Artists Obsessed Over Draped Fabric
It’s easy to assume that Roman artists just copied Greek models. And sure, they did—but they also innovated. The obsession with draped garments came from two places: status signaling and sheer visual drama. A toga wasn’t just a piece of cloth; it was a symbol of citizenship, rank, and even political mood. When you see a statue of Augustus with his toga pulled up over his head (the capite velato), that’s not random—it’s a religious pose. The folds had to read clearly.
The Real vs. Idealized: How Wool and Linen Behaved
Honestly? Most Roman textiles were coarser than we imagine. Average wool from Italian sheep had a loose crimp and a bit of grease—it didn’t form crisp, knife-edge pleats. Linen, on the other hand, was lighter and stiffer when new, but it softened with wear. Artists had to decide: show the fabric as it really looked, or idealize it to convey a mood? They usually split the difference.
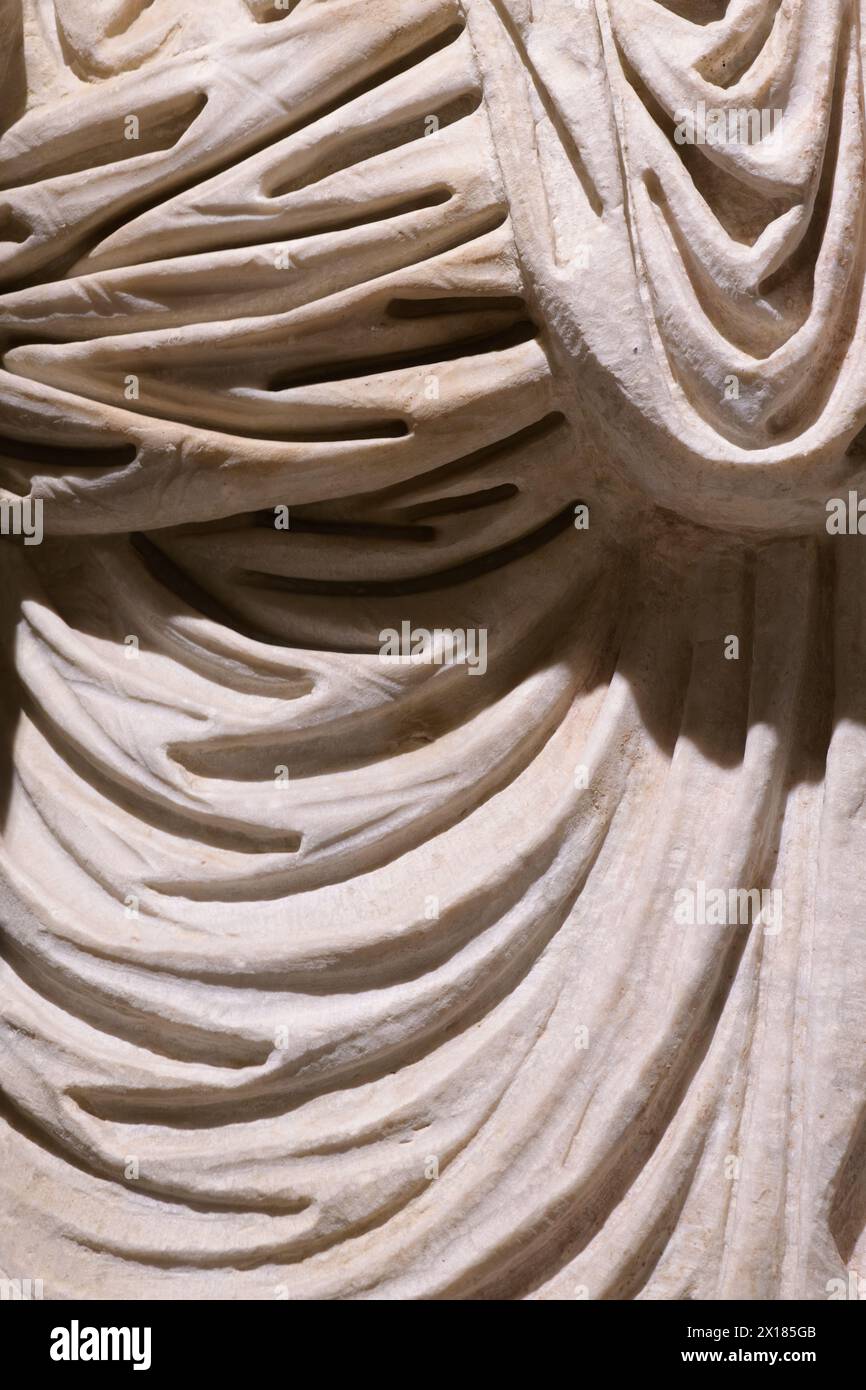
* Wool yielded deep, rounded folds with soft shadows—think of the way a heavy blanket drapes over a chair. * Linen created shallower, more angular creases, especially when starched (yes, Romans used starch). * Silk (imported from China via the Silk Road) was rare and expensive; it produced fine, multiple tiny folds that cascaded.
The key fabric folds in Roman sculpture often mix these behaviors: a toga might have the heavy vertical pleats of wool but the sharp edge of a linen border. Artists exaggerated those contrasts to guide the viewer’s eye.
The Toga, The Stola, and the Palla: Core Garments
Before we dive deeper, let’s get the basics straight. Roman garment art revolves around three main pieces:
- The Toga: A semicircular woolen cloak worn by male citizens. It required careful draping—a sinuous sinus (the curved fold across the chest) and a umbo (the bunched fabric over the left shoulder). - The Stola: A long, sleeveless dress worn by married women, often with a palla (a rectangular shawl) on top. - The Palla: Any rectangular wrap, used by both sexes but especially women. It could be folded lengthwise and draped over one shoulder or both.
Each garment produced a distinct fold language. A toga’s folds are heavy and vertical because of the pile of fabric on the left side. A stola’s folds fall straight down from the shoulders, with horizontal creases at the waist if belted. A palla creates diagonal lines across the body.
Now, here’s a dirty little secret: not all Roman statues were accurate to real life. Look—sometimes artists added folds just to show off technical skill. But the best ones followed the logic of cloth. When you study Roman garment art closely, you start seeing the “rules” they followed: folds radiate from points of tension (shoulders, pins, belts), they converge in valleys, and they never break continuity unless cut or tugged.
The Anatomy of a Fold: From Physics to Art
Let’s get nerdy. A fold happens when fabric is compressed or stretched. The Roman artisan—whether sculptor, painter, or mosaicist—had to understand three forces: gravity (pulling down), tension (pulling tight), and compression (bunching up). They represented these with lines, shadows, and highlights.
Gravity, Weight, and the Direction of Folds
You can spot a beginner’s mistake from a mile away: folds that go nowhere. In real draped garments, gravity dictates that most folds run vertically—downward from a shoulder or a waistband. Diagonal folds happen when an arm is raised or when fabric is pulled across the body. Horizontal folds happen only when fabric is gathered or when a person bends at the waist.
I once spent an afternoon in a museum counting folds on a first-century marble Venus. Here’s what I noticed:
- Vertical folds dominated the lower half of the garment—they’re stable, restful. - Diagonal folds appeared around the raised arm and hip—dynamic, suggesting movement. - Concentric folds (like ripples around a knot) marked the tie at the shoulder.
The Romans used these patterns consistently. A standing figure with no movement had almost parallel vertical folds. A figure in motion showed diagonal converge points. A seated figure had crushed horizontal folds at the lap.
And here’s a pro tip: the thickness of the fold ridge—the raised part between two valleys—told you the fabric’s weight. Thick ridges meant heavy wool; thin, sharp ridges meant linen or fine cotton. Artists even mimicked the “sag” of fabric between pins.
How Sculptors Simulated Cloth in Marble
Now for the magic trick. How do you make cold, hard marble look like soft, flowing cloth? It’s all about light and shadow. Roman sculptors used specific carving techniques to create the illusion of fabric folds.
1. Undercutting: They carved deep, narrow channels between the folds so that light would hit the ridge and leave the valley dark. This gave extreme contrast—the fold seemed to stand out from the body. 2. Drill work: A running drill (a hand-powered rotary tool) created smooth, continuous grooves. This allowed long, flowing lines that mimicked the sweep of cloth. 3. Polished vs. rough surfaces: The raised folds were often polished to a high sheen, while the recessed valleys were left slightly rough. This made the ridges catch light and appear “alive.” 4. Negative space: Sometimes they carved the fabric away completely from the body (you can see right through the gap between an arm and a draped sleeve). That’s a bold move—it tells you the cloth isn’t glued to the skin.
Think about the Augustus of Prima Porta. The cuirass is hard and metallic, but the cloak draped over his left arm? It’s a cascade of deep, irregular folds. The sculptor knew the cloak would bunch behind the arm and hang in a heavy curtain. Those folds aren’t decorative—they’re structural.
And let’s not forget painting. In Roman wall frescoes (think Pompeii), artists used highlights and shadows—no actual texture—to suggest folds. They’d paint a thick line for the ridge and a thin, dark line for the valley. Simple, but devastatingly effective.
Common Mistakes Modern Artists Make When Copying Roman Folds
I’ve taught workshops on Roman drapery, and I see the same errors again and again. Let me save you the embarrassment—and the wasted marble.
Overusing the 'Romanesque' Zigzag
There’s a cliché fold pattern that looks like a series of zigzags, often seen in cheap reproductions. Real Roman garment art almost never did that. Zigzags only happen when fabric is pinched at both ends and twisted—like pulling a rope. In a toga, the folds are long, curving S-shapes, not sharp angles. Look at any genuine Roman statue: the undulating lines are smooth, like a slow river, not a lightning bolt.
The mistake comes from copying Renaissance copies of Roman art—which introduce more artificial geometry. Go back to the source: a first-century Roman marble will show organic flow, not mathematical pattern.
Ignoring the Fabric's Thickness
Another blunder: treating all folds as if they’re made of wet tissue paper. Roman cloaks were thick—think modern blanket weight. A fold that would require a mountain of fabric in reality gets drawn as a hairline crease. No. A heavy wool fold is about one to two centimeters wide in a life-size statue. The ridge should be substantial.
If you’re drawing or sculpting, ask yourself: “Would this fold actually hold its shape if I picked up the garment?” If not, you’ve lost the logic. The Romans rarely let physics slip. They understood that a deep fold needed a certain amount of cloth to create it, and they represented that volume honestly.
And one more: forgetting the pinch points. Folds always originate from a point where the fabric is secured—a button, a pin, a hand gripping the cloth. If you have a fold that just starts in the middle of nowhere, you’ve broken the illusion.
Practical Insights for Artists and Historians
So how do you use this knowledge? Let’s get actionable.
How to Identify Period-Specific Draping Styles
Roman garment art evolved over centuries. Early Republic statues (5th–3rd centuries BCE) show stiff, archaic folds—almost geometric. The toga was worn without the sinus (the curved chest fold) until around the 2nd century BCE. Imperial period (1st–2nd centuries CE) favored deep, flowing fabric folds that exaggerated the body underneath. Late Empire (3rd–4th centuries) started simplifying—folds became repetitive and schematized, hinting at the medieval turn.
To date a piece, look at:
- The presence of the sinus – If the toga has a prominent U-shaped fold across the chest, it’s likely Imperial. - The length of the folds – Long, heavy vertical columns suggest a late-Imperial or even early Byzantine style. - The treatment of the shoulders – Early statues have pinched folds at the shoulder; later ones let the cloth hang freely.
Using Light and Shadow to Read Folds in Paintings
If you’re a painter or a digital artist, focus on value contrast. Roman fresco painters used three distinct tones: light (ridge), midtone (slope), dark (valley). The valley wasn’t black—it was a darker version of the fabric color. They avoided pure black because it would kill the sense of volume.
Here’s a quick exercise I give my students:
1. Find a photo of a draped Roman statue. 2. Convert it to grayscale. 3. Trace the lightest lines (the ridges) and the darkest lines (the valleys). 4. Notice how the ridges are rarely straight—they curve gently. 5. Count how many ridges cross the body. Too few? The fabric looks thin. Too many? It looks crushed.
The sweet spot for a toga is about 7–10 major ridges across the chest, and 12–15 down the front. That’s the range you see in authentic works.
Common Questions About Understanding Fabrics and Folds in Roman Garment Art
Why do some Roman statues have incredibly deep undercuts while others look flat?
That comes down to the period and the material. Early Roman works in marble (1st century BCE) often have shallow folds because sculptors were still mastering the drill. By the 2nd century CE, workshops in Rome and Greece had perfected deep undercutting to create dramatic shadows. But also, provincial workshops (in Gaul or North Africa) might lack the skill or the good marble, so folds stay shallow. It’s a mix of date, location, and budget.Did Roman painters use the same fold logic as sculptors?
Mostly yes, but with a caveat. Painters had an advantage: they could show translucent effects—like a thin stola revealing the leg beneath. Sculptors couldn’t do that (marble doesn’t get transparent). So painters sometimes “cheated” by indicating folds with just a few brushstrokes, relying on the viewer’s brain to fill in the fabric. But the underlying rules of tension and gravity are identical. A painter who didn’t understand fold origins would produce flat, lifeless drapery.How can I tell if a modern reproduction of Roman folds is accurate?
Look at the direction of the folds on the sleeve. In a real Roman tunic (the tunica), the sleeves are often folded in a spiral around the arm, not just straight lines. Many modern costumes make the mistake of having vertical folds on the sleeve—that only works if the arm is hanging straight down. If the arm is bent, the folds should twist. Also, check the hem: Roman garments usually have a small weight (lead or bronze token) sewn into the hem to help it hang. This rarely appears in art, but the hem’s slight undulation is a clue.Were there any fabrics that Romans didn’t use for draped garments?
Yes—silk was too rare and expensive for everyday wear until late Antiquity. Most draped clothing was wool or linen. But there’s evidence of cotton from India appearing in the 1st century CE, though it was uncommon. Leather and felt were used for armor and hats, but never for the flowing fabric folds we see in statues. So if you see a Roman statue with what looks like heavy leather folds, it’s probably a misinterpretation by a later copyist.What’s the single biggest takeaway for someone studying Roman garment art?
Understand that folds are never random. Every crease has a cause: a pinch, a pull, a sag. The Romans mapped those causes onto their art with stunning precision. Once you start looking for the physics, you’ll see the genius behind the marble. And that’s the real beauty of Roman garment art—it’s not just decorative; it’s a frozen diagram of how cloth interacts with the human body.